KaZoo 2016 Year in Preview

Mista Lista is back, baby! Since the entirety of the ‘Zoo has been a construction zone for awhile, Mista Lista took a long vacation. A sabbatical, if you will. Now refreshed and ready for the new year, Mista Lista is back on the blog to share a sneak peek of what’s on the schedule for 2016 in the ‘Zoo.

Mista Lista has noticed the KaZoos aren’t the best at finishing projects on schedule (Can I get an amen?), or remotely close to schedule, for that matter.  I call it Creative Minds Meets If You Give a Mouse a Cookie Complex.

Creatives aren’t always known for progressing sequentially and logically along the shortest possible path to the endzone. They zig. They zag. They occasionally throw a series of backward passes. Wait a sec, that’s football. My bad.

Creative types often start a number of projects that sit in various stages of semi-completion as their enthusiasm for one idea is soon overtaken by inspiration for another. Their creative energy is diverted again, and again, and again, leaving them with a garage full of tools/supplies and a house full of construction projects hazards.

And of course, this haphazard completion is helped (?) along when the beginning of Project A leads to the beginning of another related Project B. For example, when the KaZoos wanted to install their range hood vent, it meant tearing down the upper kitchen cabinets first to make room for said hood vent. But cutting holes in the roof for exterior ventilation meant getting someone to cut the hole in the roof and seal the opening (that would guarantee the work). And given the existing roof was nearing the its end of life, shouldn’t they just go ahead and replace it while the guy was coming out to look at the roof? And on the story goes. Anyone else need a cookie and milk after that? I thought so. 

Therefore, without further ado, I give you the KaZoos’ 2016 resolution:

Finish what you started.

Startling, I know.

So what’s on the docket? Here goes, in no particular order:

Mrs. KaZoo’s Dissertation
We’ll start with the most depressing and boring project, Mrs. KaZoo’s dissertation. Yup, this project is getting knocked out in 2016. I realize this probably doesn’t interest (m)any of you, so enough about that.

King Quilt
Mrs. KaZoo plans to finish the king quilt she started two (three?) years ago so that the KaZoos have cooler covers for the warm summer weather.

IMG_2154

Backyard Fence
The KaZoos have had a partially fenced backyard for months now-the result of working steadily but slowly to replace fence panels as time and money allowed. As the KaZoos near the year anniversary of starting their fence job (March), they plan to have this baby complete and inspected before winter is over, or February. They actually tackled the back gate the previous weekend, so here’s hoping they can get a few more panels and the last two gates done in the next couple of weekends.

IMG_4309

Fireplace Wall
It’s time for the fireplace to get some more love, just in time for Valentine’s Day, perhaps? The KaZoos built footings for the mantel last weekend, so all that’s left is to reinstall the mantel, caulk, paint, and tile the fireplace surround. And calling a chimney sweep to clean things up from the renters who tried to burn wood in a fireplace designed for gas logs. I know, right?! 

IMG_3845

Floors
The longest project in the history of the ‘Zoo. Seriously. What’s left, you ask? Laying underlayment in the guest wing, tiling and grouting the guest wing, and tiling and grouting the master wing. Oh, and the kitchen and master bath after those get demolished. 

IMG_5008

Baseboards
Once they get the floors finished, the KaZoos plan to install new, chunkier baseboards.

IMG_5063-1

Paint Touchups
The Kazoos need to touchup the paint in a few areas around the house. Seriously, people. A finished paint job makes everything look more polished.

IMG_5503

Kitchen Renovation
The KaZoos also have a BIG kitchen reno in the works. Design, demo of existing pantry, relocation of refrigerator and waterline, new drywall and paint, purchase and installation of new cabinets and countertops, you know. All in a day’s work, right? Smirk.

IMG_3095

The fools KaZoos intend to complete all of these projects in the first half of 2016, but I’m not going to hold them to any promises. {Wink.}


Mista Lista: To Do/Ta Da List Summer in Review

Mista Lista is back by popular demand with a quarterly post on how the KaZoos are improving the ‘Zoo one bullet point at a time. Here’s the latest on the to do/ta da situation at the ‘Zoo:

Yard

Last Year                                                                                 This Year

IMG_3063IMG_4756

  • Moving gate latch to the inside of the backyard (Surprise! We discovered we did in fact have a gate latch already, but it was put on the outside to allow free access to our backyard to any interested parties…what-tha-what?)  We now realize how the neighbors were able to show other interested buyers the backyard while we were looking at the inside with our realtor!) (1)
  • Cut down imposing magnolia in side yard (2)
  • Trim trees, shrubs, and grasses (2)
  • Remove sago palms in the way of mowing (2)
  • Replace rotted fence board (2)
  • Test/correct sprinkler aim (2)
  • Clear easement behind fence to keep weeds out of our yard (2)
  • Remove overgrown (ugly) hedges and grasses and snakes, oh my! (2)
  • Remove scalloped landscape edging (3)
  • Add new plants, mulch, and edging (3)
  • Replace odd flower bed between entry and driveway with brick pavers so that we aren’t stepping out of our car into the flower/weed bed (2)
  • Cut down magnolias in backyard (3)
  • Paint faded mailbox (2)
  • Shadowbox wood fence (3)
  • Line fence with crape myrtles for low maintenance privacy and shade (3)
  • Add edible plants! (3)
  • Upgrade fence (4)
  • Add gate on garage side for convenience (4)
  • Add sunporch? (4)
  • Add pool? (4)

Paved Areas, Garage, and Attic

Last Year /This Year (not much change here!)

IMG_3065

  • Fix garage door keyless entry that cannot be reset/changed for some reason (1)
  • Install paddleboard storage to get paddleboard out of the living room (2)
  • Install carpet squares for walking path around garage hazards (2)
  • Build garage racks for storage (2)
  • Uninstall wire shelving and cut to fit Master Bedroom Closet (2)
  • Pressure wash driveway, front sidewalk, and back patio (2)
  • Patch cracked concrete (2)
  • Fix attic stairs (2)
  • Find new home for plywood hurricane window covers to maximize floor space (3)
  • Organize garage shelves and floor areas so we can find things we need to knock out things on the to do list (2)
  • Install second paddle board rack for Amy’s new board (2)
  • Take out rest of yellowed sunbursts in garage door (so much better!) (2)
  • Install pegboard, hooks, etc.  for functional vertical storage (3)
  • Add floor to attic for functional storage (3)
  • Paint (3)

House Exterior

Last Year                                                                                 This Year

IMG_3064IMG_4758

  • Change locks (1)
  • Make key copies (1)
  • New wind standard roof (1)
  • Replace weather stripping on back door (2)
  • Remove corrosion from back door (2)
  • Add storm door (3)
  • Buy hurricane shutters to replace plywood (3)
  • Repaint house numbers (2)
  • Replace front door (4)
  • Replace garage door with wind standard garage door (4)

House Interior

Last Year/This Year (not much changed here)

IMG_3066

  • Install new smoke detector batteries (1)
  • Change air filter (1)
  • Install Nest thermostat (2)
  • Install carbon monoxide detector (2)
  • Recaulk windows (2)
  • Install reverse osmosis system (2)
  • Replace windows with energy efficient windows (3)
  • Color correct light fixtures and door knobs (4)
  • Replace cracked/Color correct faceplates/sockets/switches (4)

Foyer, Hallways, and Linen Closet

Last Year                                                                                 This Year

IMG_3052

  • Tear out carpet and vinyl tile (1)
  • Scrape ceiling (3)
  • Paint walls and trim (3)
  • Upgrade flooring to wood-look tile (3)
  • Redesign guest linen closet to function as coat closet (we have two linen closets but no coat closet!) (3)
  • Wainscoting, beadboard, board/batten in foyer (some sort of special wall treatment) (4)

Front Bedroom (Guest Bedroom)

Last Year                                                                                 This Year

IMG_3045

  • Buy wooden dowel to “lock” broken window (1)
  • Tear out carpet (1)
  • Scrape popcorn ceiling (1)
  • Prime and paint ceiling (1)
  • Prime walls/trim (1)
  • Install MBR ceiling fan so there is a light source and air circulation (this room gets stuffy!) (1)
  • Remove hideous wood-look blinds (1)
  • Install curtain rod (2)
  • Paint walls/trim (1)
  • Install wood-look tile (3)
  • Upgrade shelving in closet (4)

Guest/Hall Bathroom

Last Year                                                                                 This Year

IMG_3049

  • Paint walls/trim (3)
  • Replace toilet (3)
  • Replace shower head (3)
  • Replace sink hardware (3)
  • Replace vinyl tile floors with wood-look tile (3)
  • Replace lighting (4)
  • Frame out mirror (4)
  • Replace vanity/countertop (4)
  • Replace molded shower/tub combo with tub/shower with tiled walls (4)

Side Bedroom/Craft Room/Future Nursery

Last Year                                                                                 This Year

IMG_3051

  • Tear out carpet (1)
  • Remove hideous wood-look blinds (2)
  • Install curtain rod (2)
  • Install ceiling fan (2)
  • Replace ceiling (2)
  • Paint walls/trim (3)
  • Install wood-look tile (3)
  • Upgrade shelving in closet (4)

Living Room

Last Year                                                                                 This Year

IMG_3059

  • Tear out carpet (1)
  • Remove hideous wood-look blinds (2)
  • Install curtain rod (2)
  • Paint walls/trim (3)
  • Replace carpet with wood-look tile (3)
  • Take out existing ceiling fan (for bedroom 3) and replace with awesome fan (3)
  • Fix gas fireplace (4)
  • Apply new ceiling or plank the big wall (or both?) #shiplap (4)

Dining Area

Last Year                                                                                 This Year

IMG_3061

  • Remove hideous wood-look blinds (2)
  • Install curtain rods (2)
  • Paint walls/trim (3)
  • Replace light fixture (3)
  • Replace vinyl tile with wood look tile (3)
  • Install built-ins for china storage/buffet serving area (4)
  • Apply new ceiling or plank the big wall (or both)? #shiplap  (4)

Kitchen 

Last Year                                                                                 This Year

IMG_3062

  • Install our refrigerator (2)
  • Upgrade to gas range so normal family cooking can occur (2)
  • Remove hideous wood-look blinds (2)
  • Install curtain rod (2)
  • Upgrade range hood to functional one vented outside (instead of recirculating) (2)
  • Add electrical outlet for gas range behind it (currently having to plug it into a counter height wall outlet to the left of the range, maxing out the length of the electrical cord-ugh!) (2)
  • Upgrade dishwasher (3)
  • Paint walls/trim (3)
  • Replace light fixtures (3)
  • Reconfigure island (3)
  • Move refrigerator to where panty is and put new awesome pantry where fridge currently is for more functional layout (right now we can barely open our fridge door against the wall) (3)
  • Replace vinyl floors with wood look tile (3)
  • Install wood cabinets (4)
  • Install new countertops (4)
  • Install new sink and smart faucet (4)
  • Install tile backsplash (4)
  • Upgrade pantry to be cabinet pull-outs instead of wire shelves (4)

Laundry Closet

Last Year                                                                                 This Year

IMG_3054

  • Install our washer and dryer (2)
  • Paint walls/trim (3)
  • Add a laundry cart for better use of space! (3)
  • Replace vinyl tile with wood look tile (3)
  • Upgrade shelving (3)
  • Install countertop for enhanced folding (4)

Master Bedroom & Master Closet

Last Year                                                                                 This Year

IMG_3057

  • Tear out carpet (1)
  • Replace ceiling fan with awesome fan (2)
  • Remove hideous wood-look blinds (2)
  • Install curtain rods (2)
  • Scrape ceiling (3)
  • Paint walls/trim (3)
  • Change closet configuration to allow for two levels of hanging (using extra shelving from garage) (3)
  • Replace carpet with wood look tile (3)
  • Upgrade shelving in closet to non-wire rack closet system (4)
  • Build out coffered ceiling in MBR (4)

Master Bathroom 

Last Year                                                                                 This Year

IMG_3055

  • Paint walls/trim (3)
  • Replace toilet (3)
  • Replace shower head (3)
  • Install more towel rods and robe hooks (3)
  • Add double shower rod for more room in shower + hanging space for swimwear(3)
  • Replace vinyl tile floors with real tile (3)
  • Tear out awkward linen closet stealing space from vanity (3)
  • Tear out awkward doorway to toilet/tub/shower area (3)
  • Swap wimpy vanity and torn-out linen closet + dead space with master closet (4) MASSIVE RENO AHEAD!
  • Replace 1 old-person shallow tub/shower combo with 2 person tub (4)
  • Tile bath surround (4)
  • Plumb and install new vanity and shower in former master closet (4)
  • Install vanity mirror(s) (4)
  • Install better lighting (4)
  • Install new (non-leaking) sink hardware (4)

Mista Lista: October KaZoo To Do

Mista Lista sat down with the KaZoo family this past weekend to do some planning and goal coordination of their next steps, now that most of the necessary, smaller, and easier tasks are out of the way.  Note: Painting the remaining rooms doesn’t even count as a smaller, easier task because the KaZoos will have to rent equipment to be able to reach their high ceilings and move their heavy furniture to do so.  Mista Lista does take pity on the KaZoos every once in awhile.  Mista Lista advised the KaZoos to tackle future to dos in a more time and cost-effective way than their frenzied spring/summer get-it-done-yesterday madness approach.  The new plan is to tackle one big project, one medium-sized project, and three smaller projects, plus conduct research and purchase materials necessary for forthcoming projects in November.  Here’s what Mista Lista helped the KaZoos plan for the month of October.

Projects on Deck:

The Escalade

Painting the living room, dining room, and the rest of the kitchen is the big project of the month.  If the size of these walls (over 13′ high, and running the width and length of the public spaces in the house) isn’t enough to earn the Escalade designation alone, having to rent equipment that costs money and requires logistical planning is also a big deal. Note the height of the ceiling over the height of the baby grand piano with its lid raised. Yes, that is an empty frame on the wall. It’s a placeholder.IMG_3221

The Camry

Coming in second place is putting the finishing touches on the yard, and by this we mean finish clearing the overgrown easement behind our house (note the ginormous, blooming wild shrub+ vine combo), replace broken sprinkler heads, finish edging/mulching the flower beds in the backyard, and transplanting crape myrtles to the backyard fence row for low maintenance privacy and shade.  Sounds like a pretty big job, right? It is.  This might be more like a BMW 7 series sedan instead of a Camry sized job, but all of these things can be accomplished in one long day’s work without needing extra equipment, hence the mid-size designation. You may be thinking, um, but wouldn’t a Bobcat rental help with clearing the easement? Yup, if only we could get one back there. 

IMG_3218

The Focus, the Fiat, and the Fit

Painting the house numbers, exterior light fixtures, and mailbox is one of our bite-sized projects for October. We plan to ORB the light fixtures, but the mailbox has to stay a standard black per HOA regulations.  We haven’t decided what color to paint the supremely faded house numbers yet (black like they were before [we think]? ORB’d to match the light fixtures?)…any preferences/suggestions? We’d really like to upgrade the numbers down the road to some of those awesome art deco-looking numbers.  All in good time, right?

FrontDoor2

Fixing up the fireplace is also on the list.  We got a coupon in the mail for a chimney sweep, and we definitely need our fireplace inspected and cleaned.  It is supposed to be a gas fireplace, but there are no gas logs…and where they should be is a grate for actual wood.  The inside of the fireplace is all black as if the people who used to live here might have burned real wood in a fireplace not really equipped to handle it.  Although we don’t really need a fireplace down here, we would like it cleaned professionally. No time like the present, right?

IMG_3220

Sprucing up the front entry to the house for fall is also on the hit, er, Fit list.  Nothing says welcome like mossy bricks, a mud/dirt dauber nest, and a dirty front door, right? We know we are supposed to leave the nest because these insects rarely sting humans but do eat spiders (take them all!), but this nest looks like it has long since been abandoned.  We I  would like some fall flowers and a nice wreath for the front door, so this may involve breaking out my crafty skills.

IMG_3064

Right now, the pots/plants you see in the picture above no longer occupy this location, and the front looks like a barren wasteland of brick pavers and dirty concrete.  The small blue and green pots were temporary guests of the front porch while their kitchen home was filled with drywall dust, and the petunias that look so healthy were ravaged by mealybugs…along with a lot of other plants in my yard. Rage. I was able to launch a fairly effective counterattack on the mealybugs and only lost three plants, but the petunias were one of the three that didn’t make it.  The only thing I found to be effective against the mealybugs was spraying my plants with rubbing alcohol (that’s the professional recommendation–not just a stupid idea I had), and the three plants that didn’t make it were so damaged that the alcohol sent them over the edge. Mealybugs are the worst, people.  If you see little grayish-white bugs that look fuzzy on your plants, grab your rubbing alcohol, put it in a spray bottle, and spray like crazy (preferably not on a rainy day where its effect will be overly diluted and not in the sun where the effect of heat + alcohol will burn your plant up).  I thought I had eradicated them from our yard a month ago, but I recently had to launch another alcohol attack after finding them on some canna lilies that they had previously ignored.  So frustrating.  I’m now stocking up on rubbing alcohol and inspecting all my plants religiously.  Apparently they are supremely invasive, massively destructive, and highly resistant, so gardeners beware.

Other October Happenings:

Our neighborhood is also having a garage/yard sale in October, and we plan to participate.  We’ve got quite a few items to sell, and Craigslist hasn’t been our friend of late.  We’ve had several people call about pieces of furniture and set up a meet, only to not show up. Thanks for wasting our Saturday that could have been at the beach, people. You know who you are.  We’re having to post ‘serious inquiries only’ on all our listings, and even still….Anyway, we’ll see how it goes.  We’re not totally enamored with the idea of a garage sale, but if we can clear out some large clutter and make some money to go towards other purchases and projects, it might be worth it.

Project Research: Dining Area Furniture

IMG_3061

We would like to replace our dining table and chairs with a farmhouse table and some new chairs/benches/something.  Our current set is a hand-me-down from my parents and not really our style, even though the mahogany finish is nice.  More importantly, two of the six dining chairs are in need of a major re-upholstery job (two have sagging seats, several have batting coming out, and the fabric is stained, worn, and dated) that is beyond our skill set, and the table isn’t safe.  One of the legs snapped last year in the city (super scary!) and my dad helped repair it well enough for it to be safe for use until we could do better.  Unfortunately, two of the other legs are now cracked and threatening to do the same thing, so it’s only a matter of time before this table gives out for good.  We recently learned of a local furniture maker who does awesome solid wood, custom pieces, so we want to investigate this vs. making a table and benches ourselves using plans from Ana White.

And that’s our October.  What projects are you tackling this month?

Mista Lista: September Aha’s and Ta Da’s

Now that the KaZoos have made almost all of the small and affordable repairs and improvements they can at this juncture (except for a few things needing to wait until cooler weather later this fall), Mista Lista will only be sharing seasonal updates on their home improvement progress.  These home improvement to do/ta da posts will come at the end of November, February, May, and August.  Not to worry, though: Mista Lista will be sharing other to do and ta da posts that focus specifically on certain projects that are receiving some KaZoo love in the interim months.  Let’s get this party started!

September Aha’s and Ta Da’s:

Receding Yard Uglies
Our neighborhood HOA has a policy (not always well-enforced) that air conditioning units and trash cans should not be seen from the road, and while some people may not follow this policy, we happen to like hiding the yard uglies.  My parents gave us a leftover lattice screen to hide our trashcan, and we bought another lattice screen to hide our AC for $17.13 (on sale at Lowe’s end of summer clearance sale).  We also put down 9 red square patio stones ($7.83 also on summer clearance) underneath our trashcan, since the grass underneath it was dying from lack of sunlight anyway.  We dug down the area so that the patio stones would be level with the ground for easily rolling the trashcan into place behind the lattice. Now if we could just hide the ugly meter in a way that would still allow it to be read….

IMG_3215

Reorganized Garage
Once the KaZoos started some of the more involved projects like installing the range hood, they realized that they needed a location to organize everything for their current and upcoming projects.  After putting away some clutter that had accumulated on various shelves in the garage, they designated one shelf as their DIY project shelf.  This shelf holds all the smaller items they are/will be using for projects, grouped by project, and sequenced by order of project.  Although one shelf may not seem like very much room for all of their DIY needs, this is one way the KaZoos are keeping their to do list manageable for the future.  Plus, now Mr. KaZoo can fit his car in the garage where all of those things were taking up valuable car real estate. Mista Lista applauds the KaZoo family’s efforts to minimize clutter and maximize efficiency.

IMG_3208

Remixed Office/Living Room
When Mrs. KaZoo first arrived from the big city, her home office was set up in the front bedroom where she would be encouraged to work by the abundant natural light.  Mrs. KaZoo knows she works best in natural light in an open, minimalist space free of distractions, and the front bedroom offered a nice picture window on the north side of the house.  Plus, this would make the front bedroom seem like less of a space-waster if it could double as an office.  Unfortunately, the cramped space in the front bedroom was cramping her thinking.  Keeping the draperies open on the picture window allowed plenty of light but also plenty of heat,  not to mention the constant distraction of neighbors passing by the window while she was working.

At the same time, the KaZoos were feeling frustrated with their living room arrangement because they could not sit on their favorite couch to watch TV, due to the size limitations of the room rendering it impossible to have the media stand opposite the sofa.  Plus, the living room was feeling very crowded with its oversized furniture awaiting a neighborhood garage sale in October.

Mrs. KaZoo had an “aha” moment when she realized that the KaZoos could swap out some furniture with existing pieces in other rooms to solve both the living room and office dilemmas.  When Mr. KaZoo came home from work one evening, they shifted the TV to a smaller TV stand, relegating the larger media stand to the front bedroom for media storage.   The smaller TV stand fit on a smaller wall in the living room, allowing the sofa to occupy the longest wall opposite the TV.

 IMG_3209

By putting the TV on the smallest living room wall instead of a bulky loveseat and moving a French chest to a different wall beside the piano, the angled wall was freed up for Mrs. KaZoo’s displaced desk.

 IMG_3214-2

Now, both desks are in the living room area (making for a more functional office space), the KaZoos can watch TV from their comfy couch, and the front bedroom still serves a valuable double purpose as book and media storage in addition to a guest room.  Having a media stand in that bedroom also provides a flat surface for guests’ suitcases, and we can eventually put a TV in that room if we so choose.  Three birds with one stone, fools.  That’s what Mista Lista calls efficiency.

Re-Mastered Closet
For under $100, the KaZoos completely redid their master bedroom closet, maximizing storage by reusing existing shelving from the garage.  See these posts for other details: Part I, Part II, & Part III.

IMG_3203Here’s the cost breakdown:

  • 1 can Sherwin Williams Harmony paint in Sea Salt = $31.79 (on sale)
  • 4 packs of Rubbermaid fastset back clamps = $7.24 (on sale)
  • 3 Rubbermaid 12 inch support brackets = $7.62 (on sale)
  • 1 pack of Rubbermaid c-clamps = $6.20 (on sale)
  • 3 Rubbermaid wall end brackets = $3.28 (on sale)

TOTAL PROJECT COST: $56.13

Not too shabby, eh?

You may have noticed that there are only ta da’s here and no to do’s.  Say what?! Mista Lista and the KaZoo family have decided to set monthly project goals, so tomorrow Mista Lista will be back sharing the KaZoo To Do list for October.

Mista Lista: Home To Do/Ta Da List August

Mista Lista took Labor Day Week off, so he’s late with the KaZoo’s August Ta Da List.  Better late than never, right?

Yard

IMG_3063

  • Moving gate latch to the inside of the backyard (Surprise! We discovered we did in fact have a gate latch already, but it was put on the outside to allow free access to our backyard to any interested parties…what-tha-what?)  We now realize how the neighbors were able to show other interested buyers the backyard while we were looking at the inside with our realtor!) (1)
  • Cut down imposing magnolia in side yard (2)
  • Trim trees, shrubs, and grasses (2)
  • Remove sago palms in the way of mowing (2)
  • Replace rotted fence board (2)
  • Test/correct sprinkler aim (2)
  • Clear easement behind fence to keep weeds out of our yard (2)
  • Remove overgrown (ugly) hedges and grasses and snakes, oh my! (2)
  • Remove scalloped landscape edging (3)
  • Add new plants, mulch, and edging (3)
  • Replace odd flower bed between entry and driveway with brick pavers so that we aren’t stepping out of our car into the flower/weed bed (2)
  • Cut down magnolias in backyard (3)
  • Paint faded mailbox (2)
  • Shadowbox wood fence (3)
  • Line fence with crape myrtles for low maintenance privacy and shade (3)
  • Upgrade fence (4)
  • Add sunporch? (4)
  • Add pool? (4)

Paved Areas, Garage, and Attic

IMG_3065

  • Fix garage door keyless entry that cannot be reset/changed for some reason (1)
  • Install paddleboard storage to get paddleboard out of the living room (2)
  • Install carpet squares for walking path around garage hazards (2)
  • Build garage racks for storage (2)
  • Uninstall wire shelving and cut to fit Master Bedroom Closet (2)
  • Pressure wash driveway, front sidewalk, and back patio (2)
  • Patch cracked concrete (2)
  • Fix attic stairs (2)
  • Find new home for plywood hurricane window covers to maximize floor space (3)
  • Organize garage shelves and floor areas so we can find things we need to knock out things on the to do list (2)
  • Install second paddle board rack for Amy’s new board (2)
  • Take out rest of yellowed sunbursts in garage door (so much better!) (2)
  • Install pegboard, hooks, etc.  for functional vertical storage (3)
  • Add floor to attic for functional storage (3)
  • Paint (3)

House Exterior

IMG_3064

  • Change locks (1)
  • Make key copies (1)
  • New wind standard roof (1)
  • Replace weather stripping on back door (2)
  • Remove corrosion from back door (2)
  • Buy hurricane shutters to replace plywood (3)
  • Repaint house numbers (2)
  • Replace front door (4)
  • Replace garage door with wind standard garage door (4)

House Interior

IMG_3066

  • Install new smoke detector batteries (1)
  • Change air filter (1)
  • Install Nest thermostat (2)
  • Install carbon monoxide detector (2)
  • Recaulk windows (2)
  • Install reverse osmosis system (2)
  • Replace windows with energy efficient windows (3)
  • Color correct light fixtures and door knobs (4)
  • Replace cracked/Color correct faceplates/sockets/switches (4)

Foyer, Hallways, and Linen Closet

IMG_3052

  • Tear out carpet and vinyl tile (1)
  • Scrape ceiling (3)
  • Paint walls and trim (3)
  • Upgrade flooring to wood-look tile (3)
  • Redesign guest linen closet to function as coat closet (we have two linen closets but no coat closet!) (3)
  • Wainscoting, beadboard, board/batten in foyer (some sort of special wall treatment) (4)

Front Bedroom (Guest Bedroom/Amy’s Office)

IMG_3045

  • Buy wooden dowel to “lock” broken window (1)
  • Tear out carpet (1)
  • Scrape popcorn ceiling (1)
  • Prime and paint ceiling (1)
  • Prime walls/trim (1)
  • Install MBR ceiling fan so there is a light source and air circulation (this room gets stuffy!) (1)
  • Remove hideous wood-look blinds (1)
  • Install curtain rod (2)
  • Paint walls/trim (1)
  • Install wood-look tile (3)
  • Upgrade shelving in closet (4)

Guest/Hall Bathroom

IMG_3049

  • Paint walls/trim (3)
  • Replace toilet (3)
  • Replace shower head (3)
  • Replace sink hardware (3)
  • Replace vinyl tile floors with wood-look tile (3)
  • Replace lighting (4)
  • Frame out mirror (4)
  • Replace vanity/countertop (4)
  • Replace molded shower/tub combo with tub/shower with tiled walls (4)

Side Bedroom/Craft Room/Future Nursery

IMG_3051

  • Tear out carpet (1)
  • Remove hideous wood-look blinds (2)
  • Install curtain rod (2)
  • Install ceiling fan from Living Room (2)
  • Replace ceiling (2)
  • Paint walls/trim (3)
  • Install wood-look tile (3)
  • Upgrade shelving in closet (4)

Living Room

IMG_3059

  • Tear out carpet (1)
  • Remove hideous wood-look blinds (2)
  • Install curtain rod (2)
  • Paint walls/trim (3)
  • Replace carpet with wood-look tile (3)
  • Take out existing ceiling fan (for bedroom 3) and replace with awesome fan (3)
  • Fix gas fireplace (4)
  • Apply new ceiling (beam and plank for the win!) (4)

Dining Area

IMG_3061

  • Remove hideous wood-look blinds (2)
  • Install curtain rods (2)
  • Paint walls/trim (3)
  • Replace light fixture (3)
  • Replace vinyl tile with wood look tile (3)
  • Install built-ins for china storage/buffet serving area (4)
  • Apply new ceiling (beam and plank for the win!) (4)

Kitchen 

IMG_3062

  • Install our refrigerator (2)
  • Upgrade to gas range so normal family cooking can occur (2)
  • Remove hideous wood-look blinds (2)
  • Install curtain rod (2)
  • Upgrade range hood to functional one vented outside (instead of recirculating) (2)
  • Add electrical outlet for gas range behind it (currently having to plug it into a counter height wall outlet to the left of the range, maxing out the length of the electrical cord-ugh!) (2)
  • Upgrade dishwasher (3)
  • Paint walls/trim (3)
  • Replace light fixtures (3)
  • Reconfigure island (3)
  • Move refrigerator to where panty is and put new awesome pantry where fridge currently is for more functional layout (right now we can barely open our fridge door against the wall) (3)
  • Replace vinyl floors with wood look tile (3)
  • Install wood cabinets (4)
  • Install new countertops (4)
  • Install new sink and smart faucet (4)
  • Install tile backsplash (4)
  • Upgrade pantry to be cabinet pull-outs instead of wire shelves (4)
  • Apply new ceiling (beam and plank for the win!) (4)

Laundry Closet

IMG_3054

  • Install our washer and dryer (2)
  • Paint walls/trim (3)
  • Replace vinyl tile with wood look tile (3)
  • Upgrade shelving (3)

Master Bedroom & Master Closet

IMG_3057

  • Tear out carpet (1)
  • Replace ceiling fan with awesome fan (2)
  • Remove hideous wood-look blinds (2)
  • Install curtain rods (2)
  • Scrape ceiling (3)
  • Paint walls/trim (3)
  • Change closet configuration to allow for two levels of hanging (using extra shelving from garage) (3)
  • Replace carpet with wood look tile (3)
  • Upgrade shelving in closet to non-wire rack closet system (4)
  • Build out coffered ceiling in MBR (4)

Master Bathroom 

IMG_3055

  • Paint walls/trim (3)
  • Replace toilet (3)
  • Replace shower head (3)
  • Install more towel rods and robe hooks (3)
  • Replace vinyl tile floors with real tile (3)
  • Tear out awkward linen closet stealing space from vanity (3)
  • Tear out awkward doorway to toilet/tub/shower area (3)
  • Replace 1 old-person shallow tub/shower combo with 2 person tub plus tile shower (3)
  • Tile bath surround (3)
  • Steal space from torn-out linen closet to replace micro-sized “double” vanity with actual double vanity (3)
  • Replace mirror (3)
  • Replace lighting (3)
  • Replace sink hardware (3)

Mista Lista: Home To Do/Ta Da List July with NEW PICS!

Mista Lista’s back with another update about the KaZoo Get it done already To Do/Ta Da list of home repairs and improvements with NEW PICTURES (about time, right?).    As always, some things are partially crossed out because they are halfway done/in progress. Some things have been added to the list, as other needs/ideas have surfaced in the last couple of months.

July in Florida is HOT HOT HOT so to escape the intense heat and humidity, we mostly worked on the inside of the house (and went paddle boarding).  In case you forgot, we are busy people who work jobs, have pets, and live in our house while renovating it (and while also trying to enjoy the fact that we live at the beach!), so our home does not look like a designer home from a magazine, especially since these pics were taken with a smartphone (we hope to get our real cameras out soon!). Without further ado, I give you the ‘Zoo:

Yard

IMG_3063

  • Moving gate latch to the inside of the backyard (Surprise! We discovered we did in fact have a gate latch already, but it was put on the outside to allow free access to our backyard to any interested parties…what-tha-what?)  We now realize how the neighbors were able to show other interested buyers the backyard while we were looking at the inside with our realtor!) (1)
  • Cut down imposing magnolia in side yard (2)
  • Trim trees, shrubs, and grasses (2)
  • Remove sago palms in the way of mowing (2)
  • Replace rotted fence board (2)
  • Test/correct sprinkler aim (2)
  • Clear easement behind fence to keep weeds out of our yard (2)
  • Remove overgrown (ugly) hedges and grasses and snakes, oh my! (2)
  • Remove scalloped landscape edging (3)
  • Add new plants, mulch, and edging (3)
  • Replace odd flower bed between entry and driveway with brick pavers so that we aren’t stepping out of our car into the flower/weed bed (2)
  • Cut down magnolias in backyard (3)
  • Paint faded mailbox (2)
  • Shadowbox wood fence (3)
  • Line fence with crape myrtles for low maintenance privacy and shade (3)
  • Upgrade fence (4)
  • Add sunporch? (4)
  • Add pool? (4)

Paved Areas, Garage, and Attic

IMG_3065

  • Fix garage door keyless entry that cannot be reset/changed for some reason (1)
  • Install paddleboard storage to get paddleboard out of the living room (2)
  • Install carpet squares for walking path around garage hazards (2)
  • Build garage racks for storage (2)
  • Uninstall wire shelving and cut to fit Master Bedroom Closet (2)
  • Pressure wash driveway, front sidewalk, and back patio (2)
  • Patch cracked concrete (2)
  • Fix attic stairs (2)
  • Find new home for plywood hurricane window covers to maximize floor space (3)
  • Organize garage shelves and floor areas so we can find things we need to knock out things on the to do list (2)
  • Install second paddle board rack for Amy’s new board (2)
  • Take out rest of yellowed sunbursts in garage door (so much better!) (2)
  • Install pegboard, hooks, etc.  for functional vertical storage (3)
  • Add floor to attic for functional storage (3)
  • Paint (3)

House Exterior

IMG_3064

  • Change locks (1)
  • Make key copies (1)
  • Replace weather stripping on back door (2)
  • Remove corrosion from back door (2)
  • Buy hurricane shutters to replace plywood (3)
  • New wind standard roof (1)* Note that this used to be a 3.  Post to follow (cue the womp, womp chorus).
  • Fix sad looking house numbers (2)
  • Replace front door (4)
  • Replace garage door with wind standard garage door (4)

House Interior

IMG_3066

  • Install new smoke detector batteries (1)
  • Change air filter (1)
  • Install Nest thermostat (2)
  • Install carbon monoxide detector (2)
  • Recaulk windows (2)
  • Install reverse osmosis system (2)
  • Replace windows with energy efficient windows (3)
  • Color correct light fixtures and door knobs (4)
  • Replace cracked/Color correct faceplates/sockets/switches (4)

Foyer, Hallways, and Linen Closet

IMG_3052

  • Tear out carpet and vinyl tile (1)
  • Scrape ceiling (3)
  • Paint walls and trim (3)
  • Upgrade flooring to wood-look tile (3)
  • Redesign guest linen closet to function as coat closet (we have two linen closets but no coat closet!) (3)
  • Wainscoting, beadboard, board/batten in foyer (some sort of special wall treatment) (4)

Front Bedroom (Guest Bedroom/Amy’s Office)

IMG_3045

  • Buy wooden dowel to “lock” broken window (1)
  • Tear out carpet (1)
  • Scrape popcorn ceiling (1)
  • Prime and paint ceiling (1)
  • Prime walls/trim (1)
  • Install MBR ceiling fan so there is a light source and air circulation (this room gets stuffy!) (1)
  • Remove hideous wood-look blinds (1)
  • Install curtain rod (2)
  • Paint walls/trim (1)
  • Install wood-look tile (3)
  • Upgrade shelving in closet (4)

Guest/Hall Bathroom

IMG_3049

  • Paint walls/trim (3)
  • Replace toilet (3)
  • Replace shower head (3)
  • Replace sink hardware (3)
  • Replace vinyl tile floors with wood-look tile (3)
  • Replace lighting (4)
  • Frame out mirror (4)
  • Replace vanity/countertop (4)
  • Replace molded shower/tub combo with tub/shower with tiled walls (4)

Side Bedroom/Craft Room/Future Nursery

IMG_3051

  • Tear out carpet (1)
  • Remove hideous wood-look blinds (2)
  • Install curtain rod (2)
  • Install ceiling fan from Living Room (2)
  • Replace ceiling (2)
  • Paint walls/trim (3)
  • Install wood-look tile (3)
  • Upgrade shelving in closet (4)

Living Room

IMG_3059

  • Tear out carpet (1)
  • Remove hideous wood-look blinds (2)
  • Install curtain rod (2)
  • Paint walls/trim (3)
  • Replace carpet with wood-look tile (3)
  • Take out existing ceiling fan (for bedroom 3) and replace with awesome fan (3)
  • Fix gas fireplace (4)
  • Apply new ceiling (Beadboard? Planked?) (4)

Dining Area

IMG_3061

  • Remove hideous wood-look blinds (2)
  • Install curtain rods (2)
  • Paint walls/trim (3)
  • Replace light fixture (3)
  • Replace vinyl tile with wood look tile (3)
  • Install built-ins for china storage/buffet serving area (4)
  • Apply new ceiling (Beadboard? Planked?) (4)

Kitchen 

IMG_3062

  • Install our refrigerator (2)
  • Upgrade to gas range so normal family cooking can occur (2)
  • Remove hideous wood-look blinds (2)
  • Install curtain rod (2)
  • Upgrade range hood to functional one vented outside (instead of recirculating) (2)
  • Add electrical outlet for gas range behind it (currently having to plug it into a counter height wall outlet to the left of the range, maxing out the length of the electrical cord-ugh!) (2)
  • Upgrade dishwasher (3)
  • Paint walls/trim (3)
  • Replace light fixtures (3)
  • Reconfigure island (3)
  • Move refrigerator to where panty is and put new awesome pantry where fridge currently is for more functional layout (right now we can barely open our fridge door against the wall) (3)
  • Replace vinyl floors with wood look tile (3)
  • Install wood cabinets (4)
  • Install new countertops (4)
  • Install new sink and smart faucet (4)
  • Install tile backsplash (4)
  • Upgrade pantry to be cabinet pull-outs instead of wire shelves (4)
  • Apply new ceiling (Beadboard? Planked?) (4)

Laundry Closet

IMG_3054

  • Install our washer and dryer (2)
  • Paint walls/trim (3)
  • Replace vinyl tile with wood look tile (3)
  • Upgrade shelving (3)

Master Bedroom & Master Closet

IMG_3057

  • Tear out carpet (1)
  • Replace ceiling fan with awesome fan (2)
  • Remove hideous wood-look blinds (2)
  • Install curtain rods (2)
  • Scrape ceiling (3)
  • Paint walls/trim (3)
  • Change closet configuration to allow for two levels of hanging (using extra shelving from garage) (3)
  • Replace carpet with wood look tile (3)
  • Upgrade shelving in closet to non-wire rack closet system (4)
  • Build out coffered ceiling in MBR (4)

Master Bathroom 

IMG_3055

  • Paint walls/trim (3)
  • Replace toilet (3)
  • Replace shower head (3)
  • Install more towel rods and robe hooks (3)
  • Replace vinyl tile floors with real tile (3)
  • Tear out awkward linen closet stealing space from vanity (3)
  • Tear out awkward doorway to toilet/tub/shower area (3)
  • Replace 1 old-person shallow tub/shower combo with 2 person tub plus tile shower (3)
  • Tile bath surround (3)
  • Steal space from torn-out linen closet to replace micro-sized “double” vanity with actual double vanity (3)
  • Replace mirror (3)
  • Replace lighting (3)
  • Replace sink hardware (3)

Mista Lista: Home To Do/Ta Da List April, May, and June

Mista Lista’s back with a belated post about the KaZoo Get it done already To Do/Ta Da list of home repairs and improvements.  So much for that monthly report!  Perhaps we can do a quarterly update instead (like this one turned out to be-whoops!) now that we are both living in the ‘Zoo together and our schedule is slowing down a bit.  As always, some things are partially crossed out because they are halfway done/in progress. Some things have been added to the list, as other needs/ideas have surfaced in the last couple of months.  Stay tuned for updated pictures, now that we have furniture for realz!

Yard

BackYard18

  • Moving gate latch to the inside of the backyard (Surprise! We discovered we did in fact have a gate latch already, but it was put on the outside to allow free access to our backyard to any interested parties…what-tha-what?)  We now realize how the neighbors were able to show other interested buyers the backyard while we were looking at the inside with our realtor!) (2)
  • Cut down imposing magnolia in side yard (2)
  • Trim trees, shrubs, and grasses (2)
  • Remove sago palms in the way of mowing (2)
  • Replace rotted fence board (2)
  • Test/correct sprinkler aim (2)
  • Clear easement behind fence to keep weeds out of our yard (2)
  • Remove overgrown (ugly) hedges (2)
  • Remove scalloped landscape edging (3)
  • Add new plants, mulch, and edging (3)
  • Replace odd flower beds in front yard along walk with brick pavers so that we aren’t stepping out of our car into the flower weed bed (2)
  • Cut down magnolias in backyard (3)
  • Shadowbox wood fence (3)
  • Line fence with crape myrtles for low maintenance privacy and shade (3)
  • Upgrade fence (4)
  • Add sunporch? (4)
  • Add pool? (4)

Paved Areas, Garage, and Attic

Driveway_View_of_House

  • Fix garage door keyless entry that cannot be reset/changed for some reason (1)
  • Install paddleboard storage to get paddleboard out of the living room (2)
  • Install carpet squares for walking path around garage hazards (2)
  • Build garage racks for storage (2)
  • Uninstall wire shelving and cut to fit Master Bedroom Closet (2)
  • Pressure wash driveway, front sidewalk, and back patio (2)
  • Patch cracked concrete (2)
  • Fix attic stairs (2)
  • Find new home for plywood hurricane window covers to maximize floor space (3)
  • Organize garage shelves and floor areas so we can find things we need to knock out things on the to do list (2)
  • Install second paddle board rack for Amy’s new board (2)
  • Take out rest of yellowed sunbursts in garage door (note the one that is already missing on the far end) (2)
  • Install pegboard, hooks, etc.  for functional vertical storage (3)
  • Add floor to attic for functional storage (3)
  • Paint (3)

House Exterior

FrontDoor2

  • Change locks (1)
  • Make key copies (1)
  • Install missing roof flashing (2)
  • Replace a couple of missing shingles (2)
  • Replace weather stripping on back door (2)
  • Remove corrosion from back door (2)
  • Buy hurricane shutters to replace plywood (3)
  • New wind standard roof (1)* Note that this used to be a 3.  Post to follow (cue the womp, womp chorus)
  • Fix sad looking house numbers (2)
  • Replace front door (4)
  • Replace garage door with wind standard garage door (4)

House Interior

Foyer4

  • Install new smoke detector batteries (1)
  • Change air filter (1)
  • Install Nest thermostat (2)
  • Install carbon monoxide detector (2)
  • Install reverse osmosis system (2)
  • Replace windows with energy efficient windows (3)
  • Color correct light fixtures and door knobs (4)
  • Replace cracked/Color correct faceplates/sockets/switches (4)

Foyer, Hallways, and Linen Closet

GuestHall

  • Tear out carpet and vinyl tile (1)
  • Scrape ceiling (3)
  • Paint walls and trim (3)
  • Upgrade flooring to hardwoods/real tile (3)
  • Redesign guest linen closet to function as coat closet (we have two linen closets but no coat closet!) (3)
  • Wainscoting, beadboard, board/batten in foyer (some sort of special wall treatment) (4)

Front Bedroom (Guest Bedroom/Home Office)

Front_Bedroom_1


  • Buy wooden dowel to “lock” broken window (1)
  • Tear out carpet (1)
  • Scrape popcorn ceiling (1)
  • Prime and paint ceiling (1)
  • Prime and paint walls/trim (1)
  • Install MBR ceiling fan so there is a light source and air circulation (this room gets stuffy!) (1)
  • Replace carpet with hardwood (3)
  • Upgrade shelving in closet (4)

Guest/Hall Bathroom

GuestBath

  • Paint walls/trim (3)
  • Replace toilet (3)
  • Replace shower head (3)
  • Replace sink hardware (3)
  • Replace vinyl tile floors with real tile (3)
  • Replace lighting (4)
  • Frame out mirror (4)

Side Bedroom/Nursery

GuestRoom4

  • Tear out carpet (1)
  • Install ceiling fan from Living Room (2)
  • Replace ceiling (2)
  • Paint walls/trim (3)
  • Upgrade to hardwood floors (3)
  • Upgrade shelving in closet (4)

Living Room

LivingRoom1

  • Tear out carpet (1)
  • Paint walls/trim (3)
  • Replace carpet with hardwood (3)
  • Take out existing ceiling fan (for bedroom 3) and replace with awesome fan (3)
  • Fix gas fireplace (4)
  • Apply new ceiling (Beadboard? Planked?) (4)

Dining Area

Dining2

  • Paint walls/trim (3)
  • Replace light fixture (3)
  • Replace floors (tile? hardwood?) (3)
  • Install built-ins for china storage/buffet serving area (4)
  • Apply new ceiling (Beadboard? Planked?) (4)

Kitchen 

Kitchen1

  • Install our refrigerator (2)
  • Upgrade to gas range so normal family cooking can occur (2)
  • Upgrade range hood to functional one vented outside (instead of recirculating) (2)
  • Add electrical outlet for gas range behind it (currently having to plug it into a counter height wall outlet to the left of the range, maxing out the length of the electrical cord-ugh!) (2)
  • Upgrade dishwasher (3)
  • Paint walls/trim (3)
  • Replace light fixtures (3)
  • Reconfigure island (3)
  • Move refrigerator to where panty is and put new awesome pantry where fridge currently is for more functional layout (right now we can barely open our fridge door against the wall) (3)
  • Replace floors (tile? hardwood?) (3)
  • Install wood cabinets (4)
  • Install new countertops (4)
  • Install new sink and smart faucet (4)
  • Install tile backsplash (4)
  • Upgrade pantry to be cabinet pull-outs instead of wire shelves (4)
  • Apply new ceiling (Beadboard? Planked?) (4)

Laundry Closet

LaundryCloset2

  • Install our washer and dryer (2)
  • Paint walls/trim (3)
  • Replace vinyl floors with real tile (3)
  • Upgrade shelving (3)

Master Bedroom & Master Closet

MasterBedroom1

  • Tear out carpet (1)
  • Scrape ceiling (3)
  • Paint walls/trim (3)
  • Replace ceiling fan with awesome fan (2)
  • Change closet configuration to allow for two levels of hanging (using extra shelving from garage) (3)
  • Replace carpet with hardwood (3)
  • Upgrade shelving in closet to non-wire rack closet system (4)
  • Build out coffered ceiling in MBR (4)

Master Bathroom 

MasterBathroom

MasterBath1

  • Paint walls/trim (3)
  • Replace toilet (3)
  • Replace shower head (3)
  • Install more towel rods and robe hooks (3)
  • Replace vinyl tile floors with real tile (3)
  • Tear out awkward linen closet stealing space from vanity (3)
  • Tear out awkward doorway to toilet/tub/shower area (3)
  • Replace 1 old-person shallow tub/shower combo with 2 person garden tub (3)
  • Tile bath surround (3)
  • Steal space from torn-out linen closet to replace micro-sized “double” vanity with actual double vanity (3)
  • Replace mirror (3)
  • Replace lighting (3)
  • Replace sink hardware (3)

There’s plenty of work left to be done.  Henceforth, at the end of every month, Mista Lista will do an update of the To Do/Ta Da List post of what the KaZoos have accomplished (and what’s left to tackle).  We hope this will be good motivation for the KaZoos to turn the to do list into a “ta- da” list as soon as possible.  Plus, we suspicion that as we settle into our house more, we will have more ideas for nifty upgrades like cool shelves in the guest bath to help with storage and maximize the dead floor space around the toilet, so the to do side of the list will probably also grow.


Demolition Diaries: R.I.P., Nasty Carpet

You know how Mista Lista said that sometimes things don’t go as planned?  Mista Lista was right.  Just after we closed on the house and had the gas heat turned on, I noticed a peculiar, unplaceable smell emanating from the front bedroom–a smell that had NOT been there when we walked through it multiple times.  Chris and my parents didn’t notice it until I brought the issue to their attention, but once I mentioned it, they could smell it, too (Ah, the power of suggestion).  We tried several solutions to get rid of the smell (airing out room for days on end, containers of baking soda and vinegar, sprinkling baking soda, carpet cleaner, and deodorizer, etc.) to no avail.  Chris didn’t really seem to notice, but I’m very sensitive to smells, especially bad smells.  It reminded me of an old nursing home.

Call me crazy, but when I went to FL for my ‘spring break’ I couldn’t take it any longer.  I couldn’t stay inside the house without getting a headache.  I asked one of my neighbors, a stay-at-home mom who seemed very knowledgeable about the goings-on at our house (maybe a little too knowledgable), if the former inhabitants were smokers, pet owners, etc.  According to her, there was no smell in the front room, they weren’t smokers, and they kept their dog at the back of the house on the vinyl tile.  I wasn’t so sure.  I noticed that some of the boxes of our things Chris had stored in the front room’s closet were starting to smell, too.  Noooo!  I bravely went around sniffing the room and determined that the primary source of the bad odor was definitely the carpet, hence why boxes sitting on the carpet smelled bad, but not the boxes on top of other boxes.  I moved all of our things out of the room.  I also noticed that the smell seemed to be drifting into the guest hall, guest bath, and the other bedroom.  The carpet had to go. 

I resorted to drastic measures.  First, I called Chris waste management to set up a bulk pickup appointment for carpet.  They told me it would be two days before pick up, and that I needed to have at least two rooms of carpet to justify the pickup.  That meant I had two days to get the carpet out of the entire front of the house. I stopped by my parents’ house for tools from my dad.  They acted surprised (and a little dubious) that I was going to tear out the carpet by myself.  But remember:

Though she be but little she is fierce. ~Shakespeare

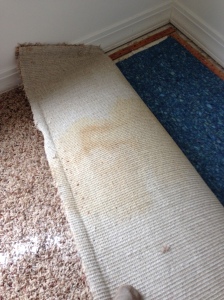
I started in a corner, making cuts with my box cutter along the baseboard along both walls meeting in the corner until I had enough to grip.  Then, I tugged, and the carpet heavens opened the carpet pulled away from the tack strips.  I could have rolled that nasty carpet up in a single roll, but I would not have been able to get it out of the room singlehandedly. I took my dad’s suggestion and cut it into manageable strips around 2 feet in width.  Once I started rolling the carpet back, I saw the signs: huge stains on every section of carpet. Clearly, someone had had an accident (or twelve) in that room.  You can imagine my disgust.

IMG_2642

The stains fueled my enthusiasm for the task, and with renewed vigor, I attacked the rug pad, slicing along the duct taped divisions and cutting it into sections.

IMG_2645

The rug pad was more difficult to dissect into strips because it was disintegrating into nasty little chunks and stuck to the concrete pad where the installers had run a bead of glue around the perimeter of the room.

IMG_2646

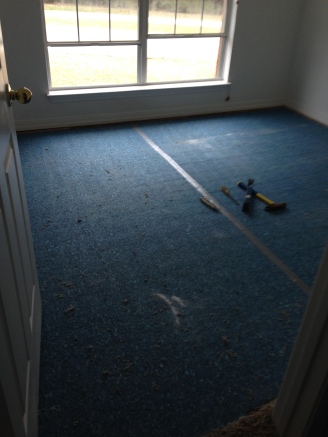
After the rug pad was torn out, I started prying up the tack strips and the concrete nails holding them down.  The installers obviously didn’t want those tack strips to move because there must have been a thousand concrete nails I had to remove one at a time (the tack strips were pretty much rotted and thus splintered into numerous bits and pieces).  I swept up the residual refuse and shop-vac’d around the baseboards to ensure I got all remaining pieces of the foul flooring.

IMG_2647

Within an hour and a half, the dirty deed was done.

And the room smelled better.  

Only better.

What?!?!

Part of the weird smell was removed with the carpet and rug pad, but now there was a definite smoker smell.  If there is one smell that we loathe above all others, it is smoker smell, especially since it is one of my many allergies.  Our home was advertised as a smoke-free home, and it had not smelled like that before.  From what we could surmise,  three possible scenarios came to mind:

  1. A + C leave the windows open to air out the carpet odor.  Random neighbor person walking his dog and smoking lingers at the front of our house, curious as to who the new people are.  Smoke drifts inside through the open window, adding to the funky smell in the room.
  2. To close on the house, the door frame wood has to be patched, painted, and pass inspection a few days prior.  The worker(s) smoke in the yard, but with the windows open due to paint odor, the smoke drifts inside.
  3. Option 2, except that the worker(s) actually smoke in the front room because it is raining, thinking with the windows open and the fan on, the smell will dissipate and no one will notice.

Whatever the situation, I was dealing with smoke when I should not have been, and I was not a happy camper.  When Chris came home, he agreed it smelled like smoke.  The walls didn’t smell, but the room still did.  No way was I going to stand by and let our family suffer third-hand smoke damage (seriously, this is a thing, people).  It was time for more troubleshooting.

I did some online research and learned three things: 1.  We needed to clean the room’s walls hardcore even if they didn’t smell bad.  2.  We needed to use odor-locking/blocking primer and odor-eliminating paint to seal in the bad smell and hopefully eliminate it once and for all.  3.  We needed to de-popcornify our ceiling (yes, that’s a word I just made up).  Apparently popcorn ceilings are notoriously bad at harboring smokiness, so we needed to scrape and clean the ceilings.

The demolition job had only just begun.

We aren’t huge fans of popcorn ceilings and had planned to clean and paint anyway, but not immediately.  Unfortunately, we needed to address the lingering smoke problem quickly before it permeated the whole house and all of our things that Chris had been steadily transporting from the city to to the coast.  Fortunately, we had a little money saved up to tackle the issue because we had planned to do these things relatively soon anyway.  I headed for Sherwin Williams and came home with the products I needed, plus an extra can of paint for the other bedroom, thanks to the good sale they were having plus coupons I had from Pottery Barn and my preferred member discount.  I essentially got three gallons of odor-fighting, premium paint for the price of one.  Yay!

Since I now had enough paint for both guest bedrooms and the clock was ticking on my bulk pickup, I went back to attacking the carpet in the other bedroom and the hallway that connects the two guest rooms.  Wouldn’t you know, the other bedroom and hallway carpet were also stained, hence why the smell was present in those locations, too.  There weren’t as many stains, but it was still gross enough to merit a swift elimination.

There was one additional complication of removing the carpet from the hallway, though: The tack strips had been nailed through the vinyl tile in the bathroom entryway and in the doorway to the foyer, and there were some rusty concrete nails that were still stuck into the vinyl tile after I pried the tack strips up.

 IMG_9554

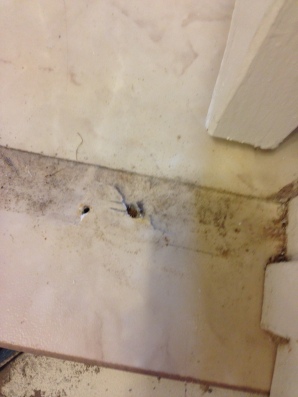
I couldn’t get the crowbar (or anything) underneath the head of the nails to pry them up because of the slick-yet-sticky, stupid vinyl tiles.  This meant tearing out some of the vinyl tile (tragedy) in order to eliminate the possibility of tetanus.  If you give a DIYer a crowbar….

IMG_4397

Overall, I overfilled ten contractor trash bags full of putrid, disgusting flooring material.  I’m glad to say all the carpet has been hauled away, although there was a mix up and it didn’t get picked up right away.  When I say mix up, I really mean a big problem: I called Waste Management on Wednesday morning to schedule the bulk pickup.  I was told to put the carpet out Thursday night and that it would be picked up sometime on Friday.  By Friday at 4:00 p.m., the carpet was still by the road, so I called again.

Apparently, someone unbeknown to us cancelled our account with Waste Management on Wednesday afternoon (despite the fact that we had paid for services for the entire quarter), so our bulk pickup request was never routed to the local folks who actually collect items.  Say what?! We were astounded to learn that you can cancel someone’s (anyone’s?) trash services with Waste Management by simply providing the address. We suspicion that the former homeowner may have called to cancel his service at our address and that the representative with whom he spoke cancelled our service at our address, but what a coincidence that it happened to be the exact same day right after I had called to schedule the bulk pickup.  Waste Management apologized for the inconvenience/misunderstanding and rescheduled our pickup for the next week, since it was late Friday.

We hauled the bags of carpet and refuse into the garage over the weekend and then back out to the curb.  Once again, the carpet was not picked up, so we called a third time.  Waste Management apologized again and submitted a third request.  By now, I was starting to worry that the neighbors would think we didn’t know that you had to call for bulk pickup and that we were fast becoming the pickup pariahs of the neighborhood.  (“Look, Maude, those fool youngsters left their carpet out again.  Don’t they know you’re supposed to call first?  That’s what happens when the house prices drop–you get a bunch of young riff-raff who don’t care about the neighborhood and don’t follow the rules.  We’d better call the HOA president.”)  Shortly after the third request was submitted, we received a call from the local WM people who apologized profusely and said that the carpet would be picked up the next morning as the first pickup location.  It was gone before Chris left for work.   They also gave us their direct line and said we could contact them directly regarding pickups, given our previous difficulties.  We sincerely hope that Waste Management starts asking  callers for additional information pertinent to the account before stopping service to someone’s home so that this doesn’t happen to other people (or to us again!).

R.I.P., nasty carpet.  Of course we do still have the living room and master bedroom to rip out, and I foresee that happening very soon, now that we know how disgusting the carpet is, even in places that aren’t oozing Great Uncle Vernon and his dog smell (We are sure that there are very nice smelling Great Uncle Vernons and their dogs out there, just not the fictitious one that occupied our front bedroom).    Until then, smell you later, carpet.

Update: We have since found out from a different neighbor that previous inhabitants DID keep their dog penned in the front areas, which definitely explains the stains/smells. Poor baby–locked up without access to a proper place to go (hello, fenced in backyard, people!).  Accidents happen, and some pets have special needs.  Regardless, if you are a family that includes animals, please be responsible for your pet’s welfare by providing appropriate venues and sufficient opportunities for elimination–for their sake and everyone else’s.

For those of you who are wondering about what has replaced the carpet, the answer is (drumroll, please)…..nothing.  That’s right, those rooms have had concrete slab floors for several weeks now and will likely stay that way for some time until we have saved up for the good hardwoods we want.  Mista Lista approves this plan, even if it means that some of our soon-to-be-arriving guests will have cold feet.  In the spring/summer heat, that’s not necessarily a bad thing at the coast!

Mista Lista: To Do/Ta Da List

Mista Lista’s back with the promised post about the KaZoo Get it done already To Do/Ta Da list of home repairs and improvements.  Here’s a breakdown of what made the list, organized by space.

Note: Some things are already crossed out because the KaZoos did those in the last couple of months.  Some things are half-crossed out because they are halfway done.  Don’t you love it when you can already cross something off the list you just made?  Do you ever write things on your list just so you can cross them off and feel that inflated sense of accomplishment?  It’s okay to tell Mista Lista. He understands. 

Yard

BackYard18

  • Add locking hardware to gate latch (currently just a wire/nail setup) (2)
  • Cut down imposing magnolia in side yard (2)
  • Trim trees, shrubs, and grasses (2)
  • Remove sago palms in the way of mowing (2)
  • Replace rotted fence board (2)
  • Test/correct sprinkler aim (2)
  • Clear easement behind fence to keep weeds out of our yard (2)
  • Remove overgrown (ugly) hedges (2)
  • Remove scalloped landscape edging (3)
  • Add new plants, mulch, and edging (3)
  • Shadowbox wood fence (3)
  • Upgrade fence (4)
  • Add sunporch? (4)
  • Add pool? (4)

Paved Areas, Garage, and Attic

Driveway_View_of_House

  • Fix garage door keyless entry that cannot be reset/changed for some reason (1)
  • Install paddleboard storage to get paddleboard out of the living room (2)
  • Install carpet squares for walking path around garage hazards (2)
  • Build garage racks for storage (2)
  • Uninstall wire shelving and cut to fit Master Bedroom Closet (2)
  • Pressure wash driveway, front sidewalk, and back patio (2)
  • Patch cracked concrete (2)
  • Fix attic stairs (2)
  • Find new home for plywood hurricane window covers to maximize floor space (3)
  • Install pegboard, hooks, etc.  for functional storage (3)
  • Add floor to attic for functional storage (3)
  • Paint (3)

House Exterior

FrontDoor2

  • Change locks (1)
  • Make key copies (1)
  • Install missing roof flashing (2)
  • Replace a couple of missing shingles (2)
  • Replace weather stripping back door (2)
  • Remove corrosion from back door (2)
  • Buy hurricane shutters to replace plywood (3)
  • New wind standard roof (3)
  • Replace front door (4)
  • Replace garage door with wind standard garage door (4)

House Interior

Foyer4

  • Install new smoke detector batteries (1)
  • Change air filter (1)
  • Install Nest thermostat (2)
  • Install carbon monoxide detector (2)
  • Install reverse osmosis system (2)
  • Replace windows with energy efficient windows (3)
  • Color correct light fixtures and door knobs (4)
  • Color correct faceplates/sockets/switches (4)

Foyer, Hallways, and Linen Closet

GuestHall

  • Tear out carpet and vinyl tile (1)
  • Scrape ceiling (3)
  • Paint walls and trim (3)
  • Upgrade flooring to hardwoods/real tile (3)
  • Redesign guest linen closet to function as coat closet (we have two linen closets but no coat closet!) (3)
  • Wainscoting, beadboard, board/batten in foyer (some sort of special wall treatment) (4)

Front Bedroom (Guest Bedroom/Home Office)

Front_Bedroom_1


KaZoo Family Note: There will be a forthcoming post about why this bedroom became high priority (and thus why a lot of things on this list that would normally be Phase 3 items were bumped up to Phase 1 items)!

  • Buy wooden dowel to “lock” broken window (1)
  • Tear out carpet (1)
  • Scrape popcorn ceiling (1)
  • Prime and paint ceiling (1)
  • Prime and paint walls/trim (1)
  • Replace carpet with hardwood (3)
  • Upgrade shelving in closet (4)

Guest/Hall Bathroom

GuestBath

  • Paint walls/trim (3)
  • Replace toilet (3)
  • Replace shower head (3)
  • Replace sink hardware (3)
  • Replace vinyl tile floors with real tile (3)
  • Replace lighting (4)
  • Frame out mirror (4)

Side Bedroom/Nursery

GuestRoom4

  • Tear out carpet (1)
  • Install ceiling fan (2)
  • Replace ceiling (2)
  • Paint walls/trim (3)
  • Upgrade to hardwood floors (3)
  • Upgrade shelving in closet (4)

Living Room

LivingRoom1

  • Tear out carpet (1)
  • Paint walls/trim (3)
  • Replace carpet with hardwood (3)
  • Fix gas fireplace (4)
  • Apply new ceiling (Beadboard? Planked?) (4)

Dining Area

Dining2

  • Paint walls/trim (3)
  • Replace light fixture (3)
  • Replace floors (tile? hardwood?) (3)
  • Install built-ins for china storage/buffet serving area (4)
  • Apply new ceiling (Beadboard? Planked?) (4)

Kitchen 

Kitchen1

  • Install our refrigerator (2)
  • Upgrade to gas range so normal family cooking can occur (2)
  • Upgrade range hood to functional one vented outside (instead of recirculating) (2)
  • Upgrade dishwasher (3)
  • Paint walls/trim (3)
  • Replace light fixtures (3)
  • Reconfigure island (3)
  • Replace floors (tile? hardwood?) (3)
  • Install wood cabinets (4)
  • Install new countertops (4)
  • Install new sink and smart faucet (4)
  • Install tile backsplash (4)
  • Upgrade pantry to be cabinet pull-outs instead of wire shelves (4)
  • Apply new ceiling (Beadboard? Planked?) (4)

Laundry Closet

LaundryCloset2

  • Install our washer and dryer (2)
  • Paint walls/trim (3)
  • Replace vinyl floors with real tile (3)
  • Upgrade shelving (3)

Master Bedroom & Master Closet

MasterBedroom1

  • Tear out carpet (1)
  • Scrape ceiling (3)
  • Paint walls/trim (3)
  • Change closet configuration to allow for two levels of hanging (using extra shelving from garage) (3)
  • Replace carpet with hardwood (3)
  • Upgrade shelving in closet to non-wire rack closet system (4)
  • Build out coffered ceiling in MBR (4)

Master Bathroom 

MasterBathroom

KaZoo family note: After living here a few months, we’ve decided this room needs a full renovation fairly soon, primarily due to condition and layout (not sure what/if the builders were thinking). We are constantly running into doors, banging doors into other doors, trapping someone in the awkward toilet/tub/shower area while someone is opening the linen closet, and tripping on the “helpful” tub step.  We are also scared of the toilet, especially since the window is RIGHT OVER THE TOILET.  We can totally hear the neighbor getting his trash can and talking on his phone as we sit on the toilet.  The window glass does have some sort of shape-hiding treatment, but it isn’t really frosted in a concealing way. Plus, with the light on in the separate toilet/tub/shower area, our neighbors can easily tell (from their living area!) if we are cleansing our bodies and colons.  You can only cover waist-down in the shallow tub even if you are a small person like Amy, which renders the tub fairly useless for baths. The shower curtain leaks water into the floor because the shape of the tub + step surround separates the curtain from the liner too far, even if you use sticky tabs to adhere the liner to the shower surround.  And how did the original tub and toilet not match? Seriously? One is white, the other off-white, but both are original.  You will notice that most upgrades in this room have earned priority phase 3 instead of their usual phase 4 designation.

MasterBath1

  • Paint walls/trim (3)
  • Replace toilet (3)
  • Replace shower head (3)
  • Install more towel rods and robe hooks (3)
  • Replace vinyl tile floors with real tile (3)
  • Tear out awkward linen closet stealing space from vanity (3)
  • Tear out awkward doorway to toilet/tub/shower area (3)
  • Replace 1 old-person shallow tub/shower combo with 2 person garden tub (3)
  • Tile bath surround (3)
  • Steal space from torn-out linen closet to replace micro-sized “double” vanity with actual double vanity (3)
  • Replace mirror (3)
  • Replace lighting (3)
  • Replace sink hardware (3)

There’s work to be done for sure.  Henceforth, at the end of every month, Mista Lista will do an update of the To Do/Ta Da List post of what the KaZoos have accomplished (and what’s left to tackle).  We hope this will be good motivation for the KaZoos to turn the to do list into a “ta- da” list as soon as possible.  Plus, we suspicion that as we settle into our house more, we will have more ideas for nifty upgrades like cool shelves in the guest bath to help with storage and maximize the dead floor space around the toilet, so the to do side of the list will probably also grow.

You probably noticed that nearly all the to dos on this list are “fixed” items, or items that would typically stay with a house if the KaZoos ever needed/wanted to move again.  Mista Lista and the KaZoos don’t consider buying furniture, draperies, accessories, linens, rugs, etc. home improvement: Although they definitely make a house feel more like a home, they are a more portable kind of investment than ripping out your gas fireplace to take it with you (although we’ve seen houses where people have done that (!)).  No worries, though: Mista Lista’s working on lists of those needs/wants for each space, too, because that whole where’s-the-furniture-and-stuff thing is about to change, too (countdown to truck packing: 8 days!).

Mista Lista: Planning Your ‘Pairs and ‘Provements

A few weeks months ago, Mista Lista shared the KaZoo’s home shopping (house buying, not HSN, fools!) list.  Note: Mista Lista is like the B.A. Baracus of listmaking for home improvement and all things DIY, so feel free to read that last bit with your best Mr. T-as-B.A. impression.  In fact, feel free to read the entire post like that. Just for fun. #80sTVShowsRock #ATeamFan

Now Mista Lista is sharing how the KaZoos plan for home improvement and repairs because he pities the fool who doesn’t plan.

Not surprisingly, it involves lists and pictures (for Amy) and spreadsheet making (for Chris).  Here’s a breakdown of the process:

1.  Conduct your own home inspection.  If you had a home inspection, there might be some things that the home inspector recommends you address fairly soon, such as wood rot or evidence of shoddy roof repairs for a leaking roof.  As for everything else, go room by room (or space by space if you have an open floorplan like the KaZoos), making a list of everything that needs fixing, upgrading, replacing, changing, etc.  The more parties involved, the better, as more pairs of eyes help spot things others don’t notice.

2.  Divide your list into repairs and improvements.  If it needs fixing, removing, and/or replacing due to obvious problems, Mista Lista considers it a repair.  If there is no apparent problem with it (function), other than aesthetic appearance (f0rm), Mista Lista considers it an improvement.

3.  Rank order your repairs and improvements by priorities.  After making a seemingly endless list of repairs and improvements, how do you decide what to do first?  Mista Lista recommends a riff on the Time Management Matrix, made popular by Stephen Covey.  For those not familiar, the time management matrix has four quadrants as follows:

  1. Important and Urgent (emergencies, major projects with a firm deadline)
  2. Important Not Urgent (exercise, family time, setting goals)
  3. Urgent Not Important (time-sensitive interruptions to YOUR time, often thanks to someone else)
  4. Not Urgent Not Important (TV watching, surfing web aimlessly)

Covey recommends you start with items in quadrant 1 and then work through quadrants 2, 3, and 4 to manage your time.  He also recommends spending more time in quadrant 2 to minimize future quadrant 1 items.  For example, exercising regularly and planning healthy meals contributes to overall health, theoretically reducing your risk of illness, disease, and/or some kinds of medical emergencies.  For more information see Covey’s book: First Things First.  

How does this translate into home repair and improvement prioritization?  Mista Lista and the KaZoos use four similar categories for ranking their repairs and improvements.

Quadrant/Phase 1: Important and Urgent aka”Repair Now”

 Phase 1 consists of those repairs that need to get done as soon as you move into a home, such as addressing health and safety issues (e.g., changing the locks to keep out the creepers) and major repairs, depending on the condition of your home at time of sale, especially if you bought your home “as is,” frequently a condition of homes sold by owner or homes that are sold as short sales or foreclosures.  Here, the goal is making your habitation inhabitable.

BackDoor

In the KaZoos’ case, a perfect item for this category is the removal of old carpet.  Amy has major allergies, and carpet, especially this loose pile variety, harbors allergens.   As a health issue, we need to tackle this right away, hence the Urgent and Important category.  However, we can address the problem by simply removing the carpet (repair) without us having to upgrade to better flooring right away (improvement). We KaZoos can live on concrete for awhile; a lot of people are intentionally doing concrete floors these day anyway.  #DelayedGratification #ConcreteIsCoolIMG_2642


Quadrant/Phase 2: Important Not Urgent aka “Repair in Near Future”

This is the planning and prevention phase of home improvement.  Yes, there is a phase of home improvement entirely devoted to planning and prevention of future quadrant 1 issues.  This is where you start setting your improvement goals and address minor repairs that aren’t immediately pressing. For the KaZoos, an example of a Phase 2 item would be addressing this magnolia tree that is way too close to the house.  Right now it does not pose an immediate threat, but cutting it down is important to prevent future problems/emergencies, such as major roof damage in hurricane season.

Westyard


Focusing on prevention by planning and making simple repairs along the way will likely save you time and money in subsequent phases and circumvent future Important and Urgent situations.  We’ve all seen those home improvement shows where the budget is $50k and during demolition, the renovation team discovers that the electrical and structural aren’t up to code, virtually consuming all of the budget, leaving the homeowners in tears that their beautiful hardwoods, pro grade appliances, and stone countertops are now entirely out of reach (cue violins).  Planning for problems in the budget up front (because they WILL happen–Murphy’s Law, fools) can help alleviate strain and unnecessary drama.

Quadrant/Phase 3: Urgent Not Important aka “Improve in Near Future” 

This is when your repairs should be complete (at least mostly), and you are entering a phase of homeostasis (pun intended), where you are simply trying to maintain your home and its value.  Phase 3 is also where you begin improvements that need to be done sooner than other items to facilitate homeostasis and your enjoyment of your home.  Note, these things may seem Urgent and Important, but improvements really do not count as Important things because you can live without them.  For the KaZoos, a good Phase 3 item is painting, where you get a big visual impact for a relatively small investment.  For us, painting helps our house reflect our identity, which motivates us to maintain it. Depending on your budget, Phase 3 items may be inexpensive upgrades or cosmetic improvements for the short term, whereas Phase 4 items may be that $$$$ whole kitchen renovation you’ve been planning for years.

Quadrant/Phase 4: Not Urgent Not Important aka “Improve in Distant Future”

Phase 4 is when you address things that would be nice to have but are truly cosmetic improvements. These could be things that would be a good longterm investment, but they just aren’t necessary for homeostasis and the happiness of your family at present.

Kitchen2

For example, upgrading the peeling thermofoil builder grade cabinets and scratched laminate countertops to something more durable is definitely in the works for the KaZoos, but since they are functional, there is no need to address these more expensive improvements until later.  This does not mean we will be dropping $50k on custom cabinets and countertops because (a) we aren’t those kind of people (b) we would not get a good return on that kind of investment in our neighborhood.  #FrugalFamilies

4. Organize your prioritized list.  After you’ve ranked your items using the four quadrant matrix, you can create a spreadsheet organizing your list of items by space and phase if you are like the KaZoos, or you can just stick with your reorganized list, depending on what works best for you.

5.  Track changes. Every month, the KaZoos revisit the list/spreadsheet to keep track of what needs to be done and what can be marked off.  It’s a good feeling (and good motivation!) to see the list of repairs shrinking so that we can start to focus on the improvements!

KaZoo Note: Next time, Mista Lista will take you on a tour of the KaZoo’s own To Do/Ta Da List, which will become a regular monthly feature at the end of the month.  You can be the ones who hold us accountable for getting stuff done, although Mista Lista is a tough taskmaster.  (Pity? What pity?!)