Demolition Diaries: KaZoo Kitchen Reno

Newsflash: We are back in demo mode! The KaZoo Kitchen is no more. Well, the old one anyway. When we bought the ‘Zoo in December 2013, our kitchen looked like this:

Kitchen1

It was a typical builder kitchen with basic white appliances, stock thermofoil cabinets, beige laminate countertops, beige vinyl tile, and a micro pantry. All the essentials, and all functional (mostly). Once we brought our old (but newer than theirs) fridge and a new gas range, things were looking up:

IMG_3062

After installing our hood vent in summer 2014, which necessitated the removal of some of our wall cabinets, the kitchen took a turn for the worse functionally and aesthetically. We added some hardware to facilitate drawer and door opening, but the loss of so many upper cabinets was rough. We painted to help the kitchen feel happier until we could do a real renovation.

IMG_3095

In the interim, we began discussing ideas for our future kitchen. Almost immediately, we began dreaming of relocating the refrigerator: Its position in the southeast corner meant we could never open the refrigerator door fully. Stuffing pizza boxes, jugs of milk, watermelons, holiday turkeys, etc. in the refrigerator was next to impossible, but even regular things like heads of lettuce, bagged carrots, and leftovers saved in Pyrex containers proved difficult. While buying a French door fridge might help matters somewhat, we were also frustrated with the inefficient pantry on the opposite end of the kitchen (deep but not wide = digging out 10 things to get 1 item at the back). While having a pantry is nice, we decided we’d rather have more cabinets and counterspace…and was it remotely possible that the fridge would fit in the pantry’s spot if we tore down the pantry?! We couldn’t shake the idea, and after measuring, there was joyous celebration in the KaZoo Kitchen for the kitchen-to-come.

Of course, we were concerned the pantry might be structural, but other homes with our same floorplan in the neighborhood didn’t have a floor-to-ceiling wall at the pantry (the boxy area above our pantry was completely open to the living room in the other homes), which gave us hope. We took everything out of the pantry (feel free to play “Where’s Hermes?”)

IMG_5912

and tore into the drywall above the pantry to check things out.

IMG_5920

Our basic understanding of structures was telling us we were looking good, and after getting a licensed professional to confirm our suspicions, Mission Fridge Move was a go! That’s when the fun of Demo Day began. Kicking down drywall is so…satisfying!

Once the pantry was torn out, it was amazing how open the kitchen felt! While we had attic access above the old pantry/new fridge location, my dad and I installed a new electrical circuit and outlet so that the refrigerator would have its own independent circuit. My dad is a professionally licensed electrical engineer, and while I could do the wiring myself now after years of helping him, I’d rather have a professional on the site.

There’s a lot of shoddy DIY structural, electrical, and plumbing work out there that might get missed in a regular home inspection that can be the ultimate nightmare, so be skeptical of any home that’s obviously been renovated (especially if you see signs of bad workmanship, like the worst painted-over, patched drywall you’ve ever seen). Chances are, those homeowners may not have gotten the licensed professionals, permits, or inspections necessary to ensure a quality job. Installing or moving electrical, structural, and plumbing is a huge deal. Just because a friend or family member ‘taught’ you how to do something back in the day doesn’t mean it’s up to current code or would meet the code for the state in which you now live (Florida and California have specialized requirements, for example). Calling a professional is not a sign of weakness; it is a sign of intelligence. 

We then took out the island, scraped and cleaned the remaining vinyl tiles up, lay the underlayment, and tiled the first part of the kitchen. We also patched, taped, mudded, and sanded the drywall in the new-fridge area.


After allowing those tiles to set, we took out the rest of the cabinets, only to discover damaged drywall behind the sink, where the previous residents clearly had experienced a leak at some point. We expected some damage because of the water damage we had seen in the cabinets, but it was more extensive than we had hoped.

IMG_5996

We had a mold inspection when we purchased the house that came back good to go (otherwise we would not have purchased the home), but we definitely wanted to get rid of the water damaged drywall (and the insulation behind it) ASAP, now that it was exposed and accessible.  At this point, our fridge got to move to its new, happier home. Behold the wonder and glory of being able to open the doors completely!

Can’t you hear angels singing? Hallelujah! We can. Every time I open the fridge now I can’t help but smile. You’ll note that we left the wall to the left of the fridge (a) because it had the kitchen switches on it) and (b) because we wanted the wall to hide the fridge from the view in the rest of the main living and dining area, which it does rather well.

Anyway, out went the damaged drywall, followed by the insulation, as carefully as possible to minimize possible mold spore diaspora. We took out everything in all areas evidencing any water damage plus a bit beyond the damage, both vertically and horizontally, just in case. The studs were fine, though. Whew. We installed new insulation and mold resistant purple-board (the new green-board), which was made easier with a compass-like drywall cutter than enabled us to cut clean circles for the pipe fittings and wiring.

We taped and mudded the new drywall, then lay more underlayment. The floors would already have been finished, but we wanted to keep our range connected to the gas, which has meant flooring in phases.

IMG_6074

Hermes is ready for things to be finished. So are we. Next time we’ll be sharing the finished flooring, painting, and all about the cabinets. I can’t wait to put ALL THE THINGS in the cabinets. And now back to work. 😉

The Easement Awakens

Ah, the sweet satisfaction of finishing a project–in this case, replacing our fence. Warmish weather for the win! While many of you have been blasted with winter storms of late, we’ve had nothing but blue skies on the weekends, making it possible for us to actually finish our fencing project over the course of the last four weekends.

What once looked like this:

now looks like this:

In the left picture we don’t have all the posts cut to size or caps glued on the posts, so technically the finished product looks like the picture on the right. Also, the thing under the tarp in the foreground is our fire pit, if you were wondering.

Privacy? Check! Rotting? Nope! We’re calling it good.

If you’re actually interested in the fencing project, keep reading. If not, but you’re wondering about the title, skip to the “and now for the fun part” section at the bottom for a funny story about our fencing experience. 🙂

Choosing Fence Materials
We’ve only had experience with wood fences up to this point, but we chose to install a vinyl fence at the ‘Z00 for four reasons, in no particular order:

  1. Free materials. My parents installed a vinyl fence (after having a wood fence) and had leftover materials they gave us.
  2. Coordinating with existing fencing. Our neighbors already had white vinyl fences, and the west side of our backyard was already fenced with white vinyl, thanks to that neighbor.
  3. Maintenance. The white vinyl fence is lower maintenance for this area, which is one of the reasons my parents installed a vinyl fence after living with a wood fence for awhile. The salty, humid air accelerates the weathering process of wooden fences, and even those galvanized exterior wood screw boxes will tell you they are not to be used within 5 miles of coastline.
  4. Cost. Considering the damage our existing wood fence had suffered, after pricing out replacement wood for the worst sections, it was cheaper to replace the entire thing with vinyl fencing.

Installation Process
With a regular wood fence, fencing is rather straightforward because you set the posts, then attach the panels to the posts using the runner boards. Not so with the vinyl fence we installed.

We experienced a number of issues with installing this kind of fence: The brackets that attach the panels to the posts must be attached to the posts and then to the panels. If you measure the length of the panel, set your posts, then try to install the panels between the posts, you have no wiggle room, and you can’t slide the panels down into the brackets from above if you are a two-man one man, one short woman crew. Even if you could do that, the panels aren’t uniformly sized (and aren’t always square), so creating an installation template for the distances between the posts and between the top, middle, and bottom brackets based on the measurements of one panel result in post overlaps, gaps between panel and post, or bracket misalignment. Awesome. 

IMG_5716

After experimenting with different installation techniques, we decided that the following sequence worked best: (1) Person A holds the panel level at correct height while Person B traces the top bracket location on first (already set) post. (2) Person B attaches the top bracket to the first post snugly, then Person A holds the panel level in the top bracket while Person B traces the middle bracket position. (3) Person B attaches the middle bracket to the post with a little wiggle room, then Person A holds the panel level in the top and middle brackets while Person B traces the bottom bracket position. (4) Person B attaches the bottom bracket to the post with a little wiggle room, then Person A holds the panel level in all three brackets to set middle and bottom bracket final position, while Person B drills pilot holes in the panel and then attaches brackets to panel. At this point, the panel is now attached fully to the first set post. (5) Person A continues to hold the panel level at correct height (helped somewhat by the first set and now attached post) while Person B positions the second not-yet-set post in its hole beside the panel. (6) Repeat steps 1-4 for the other post, but Person B must also check the placement of the post along the string line (for straightness of fencerow) and that the post remains plumb as (s)he attaches the brackets. (7) With Person A holding the not-yet-set post in place, Person B pours the concrete for the post. Fun times. Not really. 

IMG_5716

One of the other complications that we experienced was having to meet up with our neighbors’ fences. For example, in the back east corner of our yard, our fence doesn’t meet our east neighbor’s back fence because they have set their fence ON the back property line, rather than inside it. Since we went through the proper procedure of getting a city building permit for our fence, we will be held accountable for making sure our fence is inside the property line. It makes for a bit of an eyesore that the fences don’t line up but is what we must do. The pre-existing white vinyl fence on the west side that our west neighbors built actually sits in our yard (PAST the property line, not even on it), and there is a retaining wall that extends from their backyard into our yard that made us have to stop our back fencerow too soon to meet up with the too-inside west side fence. We had to devise a solution for this awkward arrangement. In addition, we had to make our gates, including a new gate on the northwest side, work with the east and west neighbors’ existing gates, both of which had been attached to OUR original wood fence posts. We would have preferred to move our gates further forward in our yard so that more of our windows would be fenced into our backyard (we have to stare at our east neighbor’s trashcan from our living room window-ugh), but we are required to match on the front with our neighbors, even though our fence was the original one to which THEY matched. It is so frustrating to live in a city and neighborhood with such ridiculous restrictions if you actually abide by the law.

IMG_5774

The last complication also related to the gates–namely, that the instructions provided with the gate gave the wrong specs for the allowance between gate posts, so we always had oversized gates for the space between the posts we had stood (the gates required set posts, so no wiggle room here). We had planned our post positions such that we could make the cuts for our gate sizes along the prefabricated picket lines in the panels so that the gates were sturdier and more factory-finish looking on the ends. On the first gate, we just assumed my dad had mis-measured somehow to be too tight, or “precise” of a fit. On the second gate, we thought we made the same mistake he had. By the third gate, when we experienced the same phenomenon the third time, we realized the error was not ours. Overall, this experience taught us that my dad’s adage about not reading/following the directions exactly actually made sense. We tend to be skeptical of directions for items made in certain countries based on past experiences (sorry China), but this fence was made in the States. Plus, a measured distance of 7 inches should always be 7 inches, but their specification of “7 inches” allowance needed to have been 8 inches instead. Fortunately, my dad gave us these white vinyl pieces (I can’t remember what their real purpose is) that slide over the jagged edges where we had to cut down our perfectly sized gates, and they actually make the gates look even better.

And now for the fun part
You can imagine the tedium of fencing: string, set, measure, prop, level, hold, drill, drive, repeat ad nauseam. Fortunately, some neighbor kids have provided us some much needed entertainment while we worked recently.

Behind our house is an electrical easement, and beyond that, another neighborhood. The power company allows ‘native’ weeds plants to proliferate in the easement, coming only once every three years with a Bobcat to mow them down and a wood chipper. Although some things die back in the mild Florida winters, mowing once every three years is hardly enough to keep the flesh-eating plants wild blackberries, sandspurs, cat’s claw, etc. at bay. The power company does allow us to use the easement for gardening, if you should feel like taming the jungle on your own, of course. Of course, because the jungle snakes its way through our fences into our backyards, we have to mow and weedeat the jungle anyway. Constant vigilance! as Professor Moody (or Barty Crouch, Jr.) would say.

IMG_3218

Rarely do we see anyone back in the easement. In fact, I can only remember seeing a group of teens walking through it on a holiday weekend in search of a shorter route to the beach than the main road. I suspicion they regretted their decision to hike into the jungle wearing bikinis and flipflops, given the certainty of the briars marring their flawlessly tanned skin.

Fortunately, 2015 was a mowing year, so things were a bit shorter than usual this winter, making it easier to see the neighbors’ houses, traverse the area, and most importantly, work on the fence. Late one afternoon while standing posts and panels for the back fence, we saw a couple of tween boys emerge from the undergrowth in a clearing, brandishing sticks like light sabers. They reminded me of Max from Where the Wild Things Are as they shouted and galloped through the brambles with their sticks, slashing at briars and each other. They climbed into a shabby treehouse nestled in a grove of trees in the backyard of a house in the neighborhood opposite us, a few lots down.IMG_5131

After a little while, the boys reemerged and began scavenging the opposite side of the easement for anything homeowners might have discarded in the jungle (sadly, this happens). A couple of old screened doors soon adorned their treehouse. It wasn’t too long before we heard them heading our direction–heard, not saw, because by this time we working on the side of the fence interior to the backyard and thus out of their line of sight. They stopped short directly behind us, and one of them exclaimed, “Here’s some bricks we should come back to get!” We realized then that the boys were planning to take our bricks and obviously had no idea that we were on the premises! Previously, we had been using those bricks to line our flowerbeds in the back, but we had to take the beds (and bricks) out to take down the old fence and build the new one. During this process, we had also discovered a zone of the easement along our fencerow colonized by fireants, and we used the bricks to mark the places NOT to step until we no longer had to dance delicately between the ant beds while fencing.

Chris swung open the gate we had just hung the previous weekend, and I stepped through it into the easement. You can imagine the look on the kids’ faces when they realized that we had been on the other side of the fence and had overheard their plans. The obvious leader (and quirkier of the two), managed a rather cheery “Merry Christmas!” over his shoulder as they scampered out of sight. It was the end of January, but you know.

Needless to see, we paused in our fence building to move all the bricks to a safer place deep inside our yard. Once this was accomplished and we had returned to fence work, we saw them gallop past us, carrying a discarded (and extremely dry) Christmas tree, complete with red plastic base, overhead. Presumably, it is now sitting in the “living room” of their treehouse, where we can only hope they do not play with matches. Because if they do, let’s just say, tinderbox.

Ah to be young and imaginative again.

They were hilarious to watch. Of course, they didn’t know we had been watching their antics the whole time we had been working. Of course, it could also be that we were simply so bored that a couple of kids engaged in make believe play was highly entertaining to us.

As the sun was setting, they crawled over a fence into a different backyard, presumably the other kid’s home, and disappeared until the next day.

I’m almost sad that we finished the fence, as I cannot vicariously return to Jakku or Narnia or Middle-earth, or whatever world the easement becomes for them on the weekends.

And now we will be getting a lock for our back gate so they don’t haul off our adirondack chairs, too. Wink.

KaZoo 2016 Year in Preview

Mista Lista is back, baby! Since the entirety of the ‘Zoo has been a construction zone for awhile, Mista Lista took a long vacation. A sabbatical, if you will. Now refreshed and ready for the new year, Mista Lista is back on the blog to share a sneak peek of what’s on the schedule for 2016 in the ‘Zoo.

Mista Lista has noticed the KaZoos aren’t the best at finishing projects on schedule (Can I get an amen?), or remotely close to schedule, for that matter.  I call it Creative Minds Meets If You Give a Mouse a Cookie Complex.

Creatives aren’t always known for progressing sequentially and logically along the shortest possible path to the endzone. They zig. They zag. They occasionally throw a series of backward passes. Wait a sec, that’s football. My bad.

Creative types often start a number of projects that sit in various stages of semi-completion as their enthusiasm for one idea is soon overtaken by inspiration for another. Their creative energy is diverted again, and again, and again, leaving them with a garage full of tools/supplies and a house full of construction projects hazards.

And of course, this haphazard completion is helped (?) along when the beginning of Project A leads to the beginning of another related Project B. For example, when the KaZoos wanted to install their range hood vent, it meant tearing down the upper kitchen cabinets first to make room for said hood vent. But cutting holes in the roof for exterior ventilation meant getting someone to cut the hole in the roof and seal the opening (that would guarantee the work). And given the existing roof was nearing the its end of life, shouldn’t they just go ahead and replace it while the guy was coming out to look at the roof? And on the story goes. Anyone else need a cookie and milk after that? I thought so. 

Therefore, without further ado, I give you the KaZoos’ 2016 resolution:

Finish what you started.

Startling, I know.

So what’s on the docket? Here goes, in no particular order:

Mrs. KaZoo’s Dissertation
We’ll start with the most depressing and boring project, Mrs. KaZoo’s dissertation. Yup, this project is getting knocked out in 2016. I realize this probably doesn’t interest (m)any of you, so enough about that.

King Quilt
Mrs. KaZoo plans to finish the king quilt she started two (three?) years ago so that the KaZoos have cooler covers for the warm summer weather.

IMG_2154

Backyard Fence
The KaZoos have had a partially fenced backyard for months now-the result of working steadily but slowly to replace fence panels as time and money allowed. As the KaZoos near the year anniversary of starting their fence job (March), they plan to have this baby complete and inspected before winter is over, or February. They actually tackled the back gate the previous weekend, so here’s hoping they can get a few more panels and the last two gates done in the next couple of weekends.

IMG_4309

Fireplace Wall
It’s time for the fireplace to get some more love, just in time for Valentine’s Day, perhaps? The KaZoos built footings for the mantel last weekend, so all that’s left is to reinstall the mantel, caulk, paint, and tile the fireplace surround. And calling a chimney sweep to clean things up from the renters who tried to burn wood in a fireplace designed for gas logs. I know, right?! 

IMG_3845

Floors
The longest project in the history of the ‘Zoo. Seriously. What’s left, you ask? Laying underlayment in the guest wing, tiling and grouting the guest wing, and tiling and grouting the master wing. Oh, and the kitchen and master bath after those get demolished. 

IMG_5008

Baseboards
Once they get the floors finished, the KaZoos plan to install new, chunkier baseboards.

IMG_5063-1

Paint Touchups
The Kazoos need to touchup the paint in a few areas around the house. Seriously, people. A finished paint job makes everything look more polished.

IMG_5503

Kitchen Renovation
The KaZoos also have a BIG kitchen reno in the works. Design, demo of existing pantry, relocation of refrigerator and waterline, new drywall and paint, purchase and installation of new cabinets and countertops, you know. All in a day’s work, right? Smirk.

IMG_3095

The fools KaZoos intend to complete all of these projects in the first half of 2016, but I’m not going to hold them to any promises. {Wink.}


Christmas at the ‘Zoo

Mid-October, Chris suggested we put up our exterior Christmas lights on Halloween weekend. After recovering from a serious laughing fit, I countered with Veteran’s Day, as autumn is my favorite season, even if Christmas is my favorite holiday. Glittering icicles take away from the pumpkins, and I like to let the pumpkins have their moment.

IMG_5372

We finally put up exterior lights on the weekend after Thanksgiving.

IMG_5511

Thanks to our tiny driveway and three cars, you can’t see all the lights. And the blinding orb? A snowflake. It shows up better in real life. #notaphotographer

This year, #flooring marathon2015 meant we barely got the main living areas floored in time for the holidays, so there was a bit of a delay on the decorating. But the good news is that the main areas have real floors again, and we love them!

We did manage to put up a few Christmas decorations inside before the start of December, and I even swapped out the scrapbook pages in the white frames for Christmasy ones for less than a dollar. I had a hard time choosing between all the different possibilities, so right now the wall is host to “Rustic Christmas” but will soon be switching to “Sparkly Christmas” for fun. IMG_5473
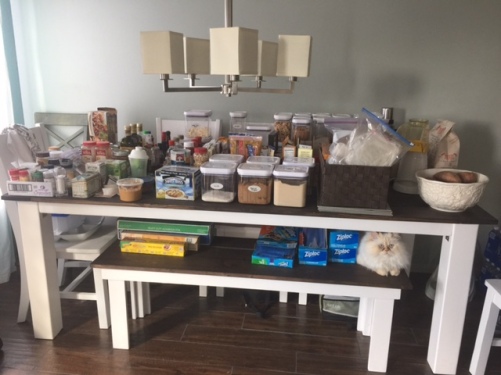
You can also see this picture features a Homer bucket housing the Internet goodies (we threw the router, AirPort, and all the cords in a Homer bucket to keep them safe from the construction), laundry being folded (hey, that’s impressive, right?), and a mirror we used to see the back of the TV for hooking up electronics. Keeping it real, peeps.

I finally put up our main Christmas tree after the first full weekend in December. As you can see, we are still touching up paint and working on the mantel. #stockingsmaynotbehungbythechimneywithcarethisyear BUT LOOK AT THOSE FLOORS. AND THE TREE!

IMG_5503

I use both white and colored lights on the same tree.  Why? Because I can. When Chris and I got married and it came time to put lights on our first big Christmas tree together, there was cause for pause: Chris’s family always used colored lights on their tree, and my family always had one tree with white lights and another with colored lights…but Chris and I only had ONE tree. What to do!? Inspiration struck, and I decided to put both white AND colored lights on the same tree but on separate circuits plugged into our multiplug.  That way, if we are feeling like a White Christmas, we can have only white lights. If we want only colored lights, we can have that as an another option, too. But we agree that both is best. More light is always the answer.

I realize the delay in decorating for Christmas is seen as a blogger crime against humanity. This is ridiculous, folks, given how many bloggers have expressed frustration and anxiety over trying to decorate early in time to be featured here and there. I understand that for most of those who fall in this category, blogging is a source of income, but seriously, people. In the interests of trying to attract and retain the attention of more popular bloggers, corporate sponsors, and followers, bloggers are sacrificing the joys of the season on the altars of commercialism, consumerism, and materialism. Jesus was apparently just fine with a stable. Why aren’t we?

Don’t get me wrong, I love decorating for Christmas, and I normally have my Christmas decorations up by Thanksgiving so we can enjoy them for longer. Because I have a pre-Christmas December birthday (and probably because I’m a girl), I have received a lot of birthday and Christmas presents that happened to be Christmas decorations. I can count on one hand the times I have purchased ornaments for myself. I love them all, and every year when I unbox them, it is like saying hello to old friends and family. I also inherited a lot of Christmas decorations from my parents who don’t decorate as much anymore, probably because they don’t have me at home to do it anymore. #childlabor #momwasallergictothetrees #dadclimbedontheroofthough #ilovedit

IMG_5504

This tree gets most of the soft ornaments because its top wobbles a bit, and the cats can reach it from the table, meaning a disaster is likely to happen.  The larger tree shown above gets soft ornaments around its base only.

Each item brings to mind the person who gave it to me–from the ornament my first babysitter gave me to the festive present lights from one of my college roommates. When I set up my Fontanini nativity scene, I remember my mother’s sister who started my collection before she suffered a heart attack and died a few years ago. This year, when I placed my Byer’s Choice carolers on the bookcase in our new library/music nook, I thought of a dear family friend whose caroler collection was the inspiration for mine; she passed a few months ago after a long battle with cancer and lingering complications. As I open each item and recall the giver, I say a prayer for those who are still living. For those who have passed, I pray for those they have left behind. IMG_5509

For the past two years, my mom has given me beachy ornaments, now that we live at the beach, so I had just enough ornaments for a small sea-themed tree. I used a tree that was rescued from my grandparents’ attic after my grandfather passed away this summer. It was in sad shape, but I think it turned out okay. It didn’t have a functional base, and since I’m too cheap/lazy to buy floral foam, I just stuck it in an old decorative urn from Pier 1, weighted down with river rocks. I don’t exactly recommend this, as Hermes has pulled it over a couple of times. #lifewithcats This tree has all the shatterproof ornaments on it, thankfully. I hope to add a starfish at the top before Christmas.

IMG_5487

If you are wondering about the ombre effect with the darker indigo lights at the base and the bright turquoise at the top, you can thank Target circa 12 years ago. I bought a set of blue Christmas lights from the Target Christmas clearance section, and the tint wasn’t uniform. I’ve always loved the anomaly, and they’re still going strong. #happyaccidents #pleasemakethemonpurpose

Now back to my concern about Christmas and the need to DECORATE WITH ALL THE THINGS. I love to decorate for Christmas because I cherish the people and memories associated with those decorations–not because my house needs to look just-so for the right people. For me, each decoration is a reminder of love.

IMG_5512My concern is that we are so busy preparing for Christmas that we miss Christmas by forgetting to be still. At the very time we celebrate Emmanuel, God with us, we forget to be with God. We have become Martha, busily cleaning and crafting and decorating and baking and shopping and gift-wrapping, instead of being Mary–just sitting and listening to what God has to say to us. Or perhaps, because of the way ‘professional’ blogging works, it appears to all the world that the best bloggers can be both Martha and Mary, rendering numerous readers (and other bloggers, even!) feeling hopelessly inadequate at both. At a time we should be demonstrating authentic love for others, we hand them unnecessary heartaches wrapped in a perfect bow instead.  Not cool. Let’s get out of the kitchen/craftroom, off the internet, and into the Word as we celebrate the time when the Word became flesh and dwelt among us.

Off my soapbox, now. I promise. And because every good post has cat pictures:

IMG_5492

At least I know they like our trees…and they know how to be still, at least for a little while! 🙂


Musical Furniture: The Game We Love to Play

It’s a running joke in my family that one of our unofficial side businesses is furniture moving.  That’s because we do it ALL. THE. TIME. We like to play furniture shuffle within our homes on a regular basis, always searching for a better arrangement that maximizes space, storage, etc. It’s part of our exercise plan. Kidding. Sort of.

Of course, the game is made more difficult by, you guessed it, musical furniture. I rarely see design bloggers working around grand pianos in small or modestly sized homes, so I thought I’d tackle this topic for our home and blog.

Musical instruments have particular needs. Climate control is important, so avoiding placement near sources of heat, cold, and moisture is vital. Dreams of baby grands gleaming in Victorian window bays shattered. Tragic, I know.  

When placing a grand piano near a wall (avoid those exterior ones, remember!), you’ll also want to allow enough room to open and raise the lid and to access all parts of it for cleaning and polishing, which typically means a minimum allowance of 12 inches away from the wall. Positioning the piano so that the long side runs parallel to the wall is more aesthetically and acoustically pleasing.

People with larger homes, multiple living rooms, and/or extra bedrooms/bonus rooms have it easy. Not so with the ‘Zoo. We have a three bedroom home with only one (not-so) great room, and we need every bedroom we have as a bedroom. No dedicated home office. No home gym. No music room. No home theater room. No basement. No bonus room. No playroom. No library. Just one modest living room with a little nook off to the side.When we bought the ‘Zoo, we were delighted that the living room had that extra nook so that my 5’ baby grand piano would only encroach upon the main walkway by a foot or so. Unfortunately, when the lid is not raised but flipped back, Chris frequently runs into its sharp corner. Sacrifices must be made right? Kidding. Definitely not for the best.

IMG_6242

To prevent further stabbings, we tried a number of different furniture arrangements in the living room over the past year or so, but nothing really felt like THE ONE. Consequently, during #flooringmarathon2015 I played around with furniture arrangements for when we could move everything from our personal “Room of Requirement” into the rest of the house. Here’s the rub:

  1. The piano has to stay in the main interior space and not in direct light or near a heat source. It cannot stay in its present position due to stabbings, nor can it be rotated in this spot without causing increased stabbings. If you are thinking that we could simply raise the lid and solve this stabbing problem, let me add that we have all tile floors and vaulted ceilings…and I’m fairly certain the neighbors can hear me playing/singing with the lid shut. I trained as a vocal performance major before shifting into education, and I’m fairly certain that my neighbors don’t dig opera…or anything remotely classical.
  2. The computer desk must be in the main interior space and receive some natural light but not suffer glare. I won’t go into detail, but suffice it to say that I don’t like working in bedrooms where relaxation is supposed to happen. Especially if said bedrooms get hot in the afternoon. 
  3. The black bookcase, like the piano, is visually and spatially dominant. It looks best when positioned against the long, tall walls of our home.  Who are we kidding? These are the only walls where it fits!IMG_4428
  4. Obviously, we need to have the sofa and love seat be in the living room if we want company. And we do. But our sofa is 92″ long.
  5. Also the TV. There is only one wall in the true living room area on which the TV fits and only one functional cable jack (not on that same wall, though, because that would make TOO MUCH SENSE). This area of the house is inaccessible for rewiring without tearing down the ceiling because there is no attic above it, so the TV cannot relocate to more spacious walls.  Awesome, right? I KNOW.IMG_4589
  6. The dining area is too small for the sitting area, and the dining set doesn’t fit in the current music nook.IMG_4375-1
  7. The thermostat also happens to be on one of the only tall long walls and could be blocked by the black bookcase, depending on its placement.
  8. No TV in the bedroom. I’m a firm believer that TV in the bedroom = less, well, ya know. Sleeping. Plus, our TV (an older model flat screen) emits some serious warmth, making our bedroom way too hot. And watching TV from the bed encourages bad back problems. Definitely don’t want more of those.
  9. I need room for exercising in front of the TV. Gyms = germs . I also am firmly opposed to exercise equipment in the bedroom or main living spaces. Call me a design snob, but it is what it is: Gym furniture is hideous. This doesn’t bother some people, and that’s to their advantage.  It kills me. Now, if someone could make a home gym disappear into an attractive armoire, then I’d be all for it. Hmmm…MY IDEA. INTELLECTUAL PROPERTY RIGHTS CLAIMED.
  10. Last of all, we must be able to walk from area to area without gut stabbings. We are anti-stabbing in this family, as all families should be.
  11. We celebrate Christmas and inherited an artificial tree with a large diameter that also gets to be squeezed into our bursting-at-the-seams living room. Christmas doesn’t get sacrificed around here, so I always include a Christmas tree in my furniture arrangements, knowing that the arrangement will be more spacious without it the rest of the year but will have sufficient space for it during the Christmas season.

If this sounds like a cross between an LSAT question and a design dilemma, you’re right.

After much deliberation, we developed a new arrangement, and the piano moved. I decided to throw caution to the winds and take a leaf out of the luxury home design book by sliding the piano into the center of our open living room area, directly in the main thoroughfare of the house.

Crazy? Yep. Tight? Definitely. BUT…

  1.  The TV, flanked by bookcases, stays where it fits (and functions) best in the living room, and the bookcases (will) hide the tangle of cords currently housed in a Homer bucket.IMG_5468 Yep, we painted the walls again. This color is for keeps.  Note the FLOORS!
  2. I prefer floating sofas, but the piano will be floating instead. Sacrifices. At least the long, plain back of the sofa won’t be visible anymore. Plus, the cats like the back of the sofa for afternoon siestas, and I’m sure they’ll like the window seat effect.
  3. The desk receives some natural light but not too much, and is located where I can cook dinner on the stove and check email simultaneously. Stay tuned for more on this in a future post.
  4. The black bookcase leaves the dining room (score), but the dining table stays, which is ideal for grabbing seconds or dessert from the adjacent kitchen (double score). Keeping it real, people.IMG_3897
  5. The piano has enough ‘walkaround’ space to avoid stabbings and is now a featured furniture piece in our home, yet it feels more tucked away than it did before somehow.
  6. Best of all, the new arrangement creates room for a new “library nook,” complete with our black behemoth bookcase and a cozy chair with optional ottoman.  The piano bench can even be used for seating! Eventually, we may add our old coffee table for puzzles, games, etc., but right now, we are enjoying the openness.  We’ve always wanted a dedicated library, and this might be the best we can do for a long time. #bibliophiles

IMG_5451

And now, because it has taken us so long to accomplish #flooringmarathon2015 that the holiday season is upon us, I give you the Christmasy version of the new music/library nook so you can actually see the piano in its new location:

IMG_5509

Customized Jewelry Storage

Personal Service Announcement: If there is one project you should hire out, it is definitely installing wood plank tile in your whole house.  In case you are wondering, yep, we are still slowly tiling our whole house. Forty, no, fifty days? Times a hundred it would seem!

Anyway, that project isn’t going to be ready to share for another 300 days (it seems), so I thought I would share a quick DIY I did last Monday while Chris was working on his car and other people were complaining about Columbus.

For the last 15 years or so, I have had a very functional jewelry armoire (from Service Merchandise–remember those days?) that my parents gave me. However, our recent NYC-apartment-like living in a fraction of our house’s square footage has amplified the need to eliminate some furniture pieces that aren’t working quite as hard as others. Let’s be honest: Sleep is essential; jewelry is not. I realize this may sound like treason to some, but my engagement + wedding rings and a pair of pearl studs are just enough bling for me most days. Ergo, the bed is in; the armoire is out.

IMG_5253

A couple of years ago, my mom made the decision to sell her jewelry armoire (purchased at the same time as mine) in the interests of having more floor space, and she has never looked back.  I decided it was time to follow suit.

I’ve noticed a trend in open jewelry storage, but I’m not a fan for two main reasons: (1) dust (2) cats. If you cycle through all your necklaces on a regular basis, you probably don’t have to worry about dust settling on your jewelry, but I would…and dust mites really aren’t a great fashion statement. In addition, we have cats that like to play with shiny, dangling objects (and one that likes to try to eat them), so this is a no-go for us.

My mom has been using these stackable jewelry boxes from Bed, Bath, & Beyond that keep her jewelry dust-free, and I opted to do the same, with a DIY modification.

IMG_5243

The set of 3 stackable trays (a bit misleading because it is really 2 + a lid) is a better buy than the separate individual trays, but the set doesn’t come with the tray with the ring/stud holder that is the very best part of my jewelry armoire. Womp, womp, womp. Typical marketing/sales ploy. 

Rather than pay $20 for the add-on section at the same time, I chose to make my own, using leftover craft materials. I didn’t have anything comparable to the velvety lining on hand, so I grabbed some craft foam.

IMG_5245

I simply cut a piece of foam to match the width of the smallest compartment, then folded it accordion-style, with each fold being slightly less than the height of the compartment, about 1/2″ long.

IMG_5252

The accordion folds give it just enough tension to wedge into the existing compartment and hold itself without the need of any adhesive.  That’s right–NO ADHESIVE NEEDED. This means you can always take the foam back out. 🙂

IMG_5251

The folds also give it the sections needed for inserting rings and studs. I used tighter folds for the studs and looser folds for the rings, and both are working just fine.

IMG_5255

Eventually I may purchase the real deal (with a good coupon!), but for the 15 minutes it took and the $20 savings right now, it was a nice quick fix to tide me over until then!

Furniture Fridays: The Thrill of the Hunt

Over Labor Day weekend we cleared out our storage unit and brought all the furniture back to our home. Some pieces found homes on the newly tiled areas of the house, while the majority of pieces were unceremoniously stuffed into our front bedroom, now jokingly referred to as the Room of Requirement. #harrypotterfans

IMG_5125

Eventually, once the rest of our floors are finished, we’ll move some pieces back into the rest of the house. Others we hope to re-home via Craigslist and our neighborhood’s fall yard sale, as we really have too much furniture for our small home.

Perhaps this is why Chris was rather surprised when I brought home a new piece of furniture Friday. Crazy? Maybe, maybe not.

After nine years of marriage, we have amassed a collection of furniture, small and large, more and less useful. Although pieces with a smaller footprint are ideally sized for our home, we also need furniture with enough room to hold our belongings. Pieces that don’t serve a particularly useful purpose must go, whereas pieces like our behemoth of a black bookcase surprisingly must stay. #bibliophiles

IMG_4607

For awhile now, I’ve been looking for just the right piece of furniture to provide storage for our home “administration station.”  I’ve tried to use our existing furniture (and various combinations thereof) for this purpose to no avail, as our mail and papers usually end up piled up on various surfaces around the house. We pay our bills on time but procrastinate when it comes to all other things paper-related.

I’ve come to the realization that we suffer from three paper-oriented problems:

  1. Our administrative things do not fit in one location, and having to transfer them from one place to another adds an extra step to an already seemingly insurmountable task.  This is akin to people dropping coats in the floor instead of opening a closet door to hang them up. Most professional organizers recommend providing coat hooks instead, as it eliminates one extra step needed for task completion. But we have another problem…
  2. The equivalent of coat hooks when it comes to paperwork is keeping papers out in the open, such as in file sorters, stackable trays, etc., but seeing papers stresses me out, paralyzing me further and ensuring the piles will keep growing. But…
  3. Keeping files obscured in file cabinets or other closed containers means out of sight, out of mind. If we can’t see the papers, we don’t do anything with them either.

On a side note, isn’t interesting that our lack of action (allowing papers to pile up instead of dealing with them straight away) enables inanimate objects (stacks of papers) that are otherwise unable to act independently to wield power over us? By not going on the offensive against paperwork (aka procrastinating), we must always be on the defensive, perpetually fleeing from or fighting an inanimate object!   

So what’s a family to do?

Given three challenges, I thought that perhaps a singular, small, yet storage-rich piece of furniture dedicated to containing the disaster all in one location might improve matters a wee bit.  While running errands on Wednesday, I popped into a local consignment store and happened upon this treasure:

IMG_5179

At 48″ in length, it is well suited to our small space, but its drawers are deep and wide, providing sufficient storage for all of our things. I talked the salesperson into reducing the price and making a slight repair before bringing it home with me Friday. Before buying, I inspected the workmanship and the original furniture marker, which turns out to be John Widdicomb of Grand Rapids. Based on the particular label, our piece is from the 1940s–not exactly an antique but definitely vintage. Sometimes the thrill of the find is equal to the thrill of the hunt!

In the next post, I’ll explain how I plan to utilize this piece to improve our paper problem. As for now, Hermes has claimed it as his own.

HermesCat

Mista Lista: To Do/Ta Da List Summer in Review

Mista Lista is back by popular demand with a quarterly post on how the KaZoos are improving the ‘Zoo one bullet point at a time. Here’s the latest on the to do/ta da situation at the ‘Zoo:

Yard

Last Year                                                                                 This Year

IMG_3063IMG_4756

  • Moving gate latch to the inside of the backyard (Surprise! We discovered we did in fact have a gate latch already, but it was put on the outside to allow free access to our backyard to any interested parties…what-tha-what?)  We now realize how the neighbors were able to show other interested buyers the backyard while we were looking at the inside with our realtor!) (1)
  • Cut down imposing magnolia in side yard (2)
  • Trim trees, shrubs, and grasses (2)
  • Remove sago palms in the way of mowing (2)
  • Replace rotted fence board (2)
  • Test/correct sprinkler aim (2)
  • Clear easement behind fence to keep weeds out of our yard (2)
  • Remove overgrown (ugly) hedges and grasses and snakes, oh my! (2)
  • Remove scalloped landscape edging (3)
  • Add new plants, mulch, and edging (3)
  • Replace odd flower bed between entry and driveway with brick pavers so that we aren’t stepping out of our car into the flower/weed bed (2)
  • Cut down magnolias in backyard (3)
  • Paint faded mailbox (2)
  • Shadowbox wood fence (3)
  • Line fence with crape myrtles for low maintenance privacy and shade (3)
  • Add edible plants! (3)
  • Upgrade fence (4)
  • Add gate on garage side for convenience (4)
  • Add sunporch? (4)
  • Add pool? (4)

Paved Areas, Garage, and Attic

Last Year /This Year (not much change here!)

IMG_3065

  • Fix garage door keyless entry that cannot be reset/changed for some reason (1)
  • Install paddleboard storage to get paddleboard out of the living room (2)
  • Install carpet squares for walking path around garage hazards (2)
  • Build garage racks for storage (2)
  • Uninstall wire shelving and cut to fit Master Bedroom Closet (2)
  • Pressure wash driveway, front sidewalk, and back patio (2)
  • Patch cracked concrete (2)
  • Fix attic stairs (2)
  • Find new home for plywood hurricane window covers to maximize floor space (3)
  • Organize garage shelves and floor areas so we can find things we need to knock out things on the to do list (2)
  • Install second paddle board rack for Amy’s new board (2)
  • Take out rest of yellowed sunbursts in garage door (so much better!) (2)
  • Install pegboard, hooks, etc.  for functional vertical storage (3)
  • Add floor to attic for functional storage (3)
  • Paint (3)

House Exterior

Last Year                                                                                 This Year

IMG_3064IMG_4758

  • Change locks (1)
  • Make key copies (1)
  • New wind standard roof (1)
  • Replace weather stripping on back door (2)
  • Remove corrosion from back door (2)
  • Add storm door (3)
  • Buy hurricane shutters to replace plywood (3)
  • Repaint house numbers (2)
  • Replace front door (4)
  • Replace garage door with wind standard garage door (4)

House Interior

Last Year/This Year (not much changed here)

IMG_3066

  • Install new smoke detector batteries (1)
  • Change air filter (1)
  • Install Nest thermostat (2)
  • Install carbon monoxide detector (2)
  • Recaulk windows (2)
  • Install reverse osmosis system (2)
  • Replace windows with energy efficient windows (3)
  • Color correct light fixtures and door knobs (4)
  • Replace cracked/Color correct faceplates/sockets/switches (4)

Foyer, Hallways, and Linen Closet

Last Year                                                                                 This Year

IMG_3052

  • Tear out carpet and vinyl tile (1)
  • Scrape ceiling (3)
  • Paint walls and trim (3)
  • Upgrade flooring to wood-look tile (3)
  • Redesign guest linen closet to function as coat closet (we have two linen closets but no coat closet!) (3)
  • Wainscoting, beadboard, board/batten in foyer (some sort of special wall treatment) (4)

Front Bedroom (Guest Bedroom)

Last Year                                                                                 This Year

IMG_3045

  • Buy wooden dowel to “lock” broken window (1)
  • Tear out carpet (1)
  • Scrape popcorn ceiling (1)
  • Prime and paint ceiling (1)
  • Prime walls/trim (1)
  • Install MBR ceiling fan so there is a light source and air circulation (this room gets stuffy!) (1)
  • Remove hideous wood-look blinds (1)
  • Install curtain rod (2)
  • Paint walls/trim (1)
  • Install wood-look tile (3)
  • Upgrade shelving in closet (4)

Guest/Hall Bathroom

Last Year                                                                                 This Year

IMG_3049

  • Paint walls/trim (3)
  • Replace toilet (3)
  • Replace shower head (3)
  • Replace sink hardware (3)
  • Replace vinyl tile floors with wood-look tile (3)
  • Replace lighting (4)
  • Frame out mirror (4)
  • Replace vanity/countertop (4)
  • Replace molded shower/tub combo with tub/shower with tiled walls (4)

Side Bedroom/Craft Room/Future Nursery

Last Year                                                                                 This Year

IMG_3051

  • Tear out carpet (1)
  • Remove hideous wood-look blinds (2)
  • Install curtain rod (2)
  • Install ceiling fan (2)
  • Replace ceiling (2)
  • Paint walls/trim (3)
  • Install wood-look tile (3)
  • Upgrade shelving in closet (4)

Living Room

Last Year                                                                                 This Year

IMG_3059

  • Tear out carpet (1)
  • Remove hideous wood-look blinds (2)
  • Install curtain rod (2)
  • Paint walls/trim (3)
  • Replace carpet with wood-look tile (3)
  • Take out existing ceiling fan (for bedroom 3) and replace with awesome fan (3)
  • Fix gas fireplace (4)
  • Apply new ceiling or plank the big wall (or both?) #shiplap (4)

Dining Area

Last Year                                                                                 This Year

IMG_3061

  • Remove hideous wood-look blinds (2)
  • Install curtain rods (2)
  • Paint walls/trim (3)
  • Replace light fixture (3)
  • Replace vinyl tile with wood look tile (3)
  • Install built-ins for china storage/buffet serving area (4)
  • Apply new ceiling or plank the big wall (or both)? #shiplap  (4)

Kitchen 

Last Year                                                                                 This Year

IMG_3062

  • Install our refrigerator (2)
  • Upgrade to gas range so normal family cooking can occur (2)
  • Remove hideous wood-look blinds (2)
  • Install curtain rod (2)
  • Upgrade range hood to functional one vented outside (instead of recirculating) (2)
  • Add electrical outlet for gas range behind it (currently having to plug it into a counter height wall outlet to the left of the range, maxing out the length of the electrical cord-ugh!) (2)
  • Upgrade dishwasher (3)
  • Paint walls/trim (3)
  • Replace light fixtures (3)
  • Reconfigure island (3)
  • Move refrigerator to where panty is and put new awesome pantry where fridge currently is for more functional layout (right now we can barely open our fridge door against the wall) (3)
  • Replace vinyl floors with wood look tile (3)
  • Install wood cabinets (4)
  • Install new countertops (4)
  • Install new sink and smart faucet (4)
  • Install tile backsplash (4)
  • Upgrade pantry to be cabinet pull-outs instead of wire shelves (4)

Laundry Closet

Last Year                                                                                 This Year

IMG_3054

  • Install our washer and dryer (2)
  • Paint walls/trim (3)
  • Add a laundry cart for better use of space! (3)
  • Replace vinyl tile with wood look tile (3)
  • Upgrade shelving (3)
  • Install countertop for enhanced folding (4)

Master Bedroom & Master Closet

Last Year                                                                                 This Year

IMG_3057

  • Tear out carpet (1)
  • Replace ceiling fan with awesome fan (2)
  • Remove hideous wood-look blinds (2)
  • Install curtain rods (2)
  • Scrape ceiling (3)
  • Paint walls/trim (3)
  • Change closet configuration to allow for two levels of hanging (using extra shelving from garage) (3)
  • Replace carpet with wood look tile (3)
  • Upgrade shelving in closet to non-wire rack closet system (4)
  • Build out coffered ceiling in MBR (4)

Master Bathroom 

Last Year                                                                                 This Year

IMG_3055

  • Paint walls/trim (3)
  • Replace toilet (3)
  • Replace shower head (3)
  • Install more towel rods and robe hooks (3)
  • Add double shower rod for more room in shower + hanging space for swimwear(3)
  • Replace vinyl tile floors with real tile (3)
  • Tear out awkward linen closet stealing space from vanity (3)
  • Tear out awkward doorway to toilet/tub/shower area (3)
  • Swap wimpy vanity and torn-out linen closet + dead space with master closet (4) MASSIVE RENO AHEAD!
  • Replace 1 old-person shallow tub/shower combo with 2 person tub (4)
  • Tile bath surround (4)
  • Plumb and install new vanity and shower in former master closet (4)
  • Install vanity mirror(s) (4)
  • Install better lighting (4)
  • Install new (non-leaking) sink hardware (4)

One Days, Todays, and Labor Days

Remember when we were I was all sorts of ambitious and thought we could complete a whole house flooring project in forty days? Smirk.  

In my defense, it has been an unusual summer. My grandfather passed away at the end of June, one of our dear family friends passed away in August, and Chris started a new job (vacation days now reset to zero). Life happens, or so ‘they’ say. Death happens, too.

Trouble is, I’m starting to realize that this is the new normal.

IMG_5107

As a child, I was a dreamer, always envisioning how things would be one day. In eighth grade, we were given a prompt to write about which age we thought would be the best age and why. Most of my classmates immediately thought of ages like 16, 18, 21, etc. I secretly thought retirement age would be best but was embarrassed about why I would want to be an ‘old person’ puttering around a garden or sitting in a rocking chair on a farmhouse porch instead of a hip teenager with a cool car and independence. {Sidenote: Why do we spend so much time wishing to be older only to become old and wish we were young instead?} 

As a young adult, I developed into a planner and hard worker, carefully setting goals, making schedules, checking off to do lists, all in the interests of achieving and earning the right to enjoy the ‘one day’ that I had envisioned retirement being.  My family has a work now, play later mentality. We handle delayed gratification well. Except not so much anymore.

I’ve watched my parents work very hard for many years, but to what end? Caring for people with dementia/Alzheimer’s disease is definitely not the peaceful retirement life I imagined. Having dementia/Alzheimer’s isn’t either.

At 31, I’ve finally realized that there is no ‘one day’–at least, not in this life. If we live for ‘one day’, we will miss today.  And tomorrow makes no promises.

One day our floors will be done.  It won’t be today, tomorrow, or anytime soon. As tired of living in chaos as I am, I am slowly accepting that chaos is normal for people who bought a fixer upper and are fixing it up as time and money allow while living in it. Also insanity.IMG_5109-2

Plus, as a DIYer, the day ‘one day’ arrives is a death sentence. This means you have ‘finished’ your space, and there is nothing left to do to improve upon it. But one day will never come, because there will always be something new that catches your eye and inspires you to tackle another project. In this sense, one day simply isn’t coming because there is a part of us that refuses to let it.

My creative desire to prolong one day clashes with my perfectionist need for one day to have come yesterday. For the floors to be done and for everything to be back in its place so that we can host dinner parties. For me to have the time to host dinner parties. For me to have the time (and space) to make dinner. For me to have the time to eat dinner. Kidding, I ALWAYS make time for eating dinner.

Dreaming and planning, like most things, are good in moderation and can bring joy. But for a recovering perfectionist like me, I have come to the conclusion that dreams and plans are also killjoys, stealing my ‘todays’ while I’m caught up in the ‘one days’ they promise to deliver. Like the plans I made to accomplish ALL THE FLOORS! in forty, no fifty, days. My plans whispered, Follow me, and you’ll have everything back to normal in no time at all! Fool that I am, I believed their lies.  IMG_5063-1

In Harry Potter and the Sorcerer’s/Philosopher’s Stone,  when Harry is held captive (figuratively) by the Mirror of Erised, Dumbledore cautions, “It does not do to dwell on dreams and forget to live.” Despite how many times I have read this book/watched the movie and thought this was sage advice, only now do I feel the depth of the knowledge and experience bound up in Dumbledore’s words.  It is one thing to know something in your head and entirely another to know it in your heart.

Our neighbors have stopped asking us if our floors are finished yet. Smart people. The eardrum shattering whine of the wet saw tells them we are making progress slowly and steadily. They know we’ll invite them over to see the finished product. One day.

We’ll be spending this Labor Day weekend grouting, cleaning, and moving furniture back into place so we can switch to working on the rest of the house (and stop paying rent on our storage unit-ugh). We will also be knocking out some of the fencing this weekend, too, if time allows. Fun times.

IMG_5040
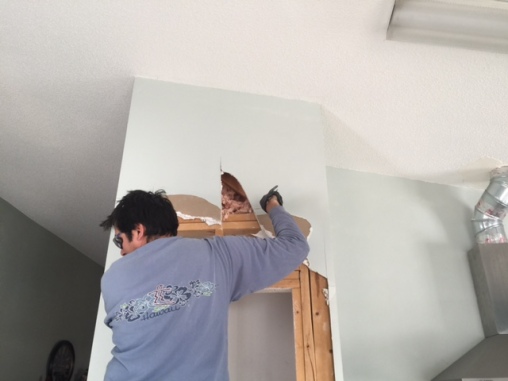
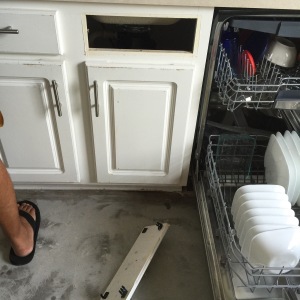
Oh, and this happened a couple of weeks ago when we were doing dishes. Our cabinets are literally falling apart. The up close picture shows you how worn they are. We think the kitchen is trying to tell us something….We hear you, kitchen. We do. You’re next. One day. 😉

Mista Lista: They See Me Mowin’

Mista Lista’s changing things up at the ‘Zoo.  Each month, Mista Lista will be taking a closer look at one part of the ‘Zoo to see how things are shaping up. This month, Mista Lista is checking on things in the yard.

Front Yard

Our goals in the front yard were fairly simple: Take out overgrown landscaping and disintegrating edging; replace with new landscaping and new edging. We didn’t take a close up of the front flower bed when we bought the house, but it was primarily a thick row of overgrown grass with a few snake inhabitants. We tore out most of the grass and replaced it with a white climbing rose, hydrangeas, hostas, and a few flowering plants, primarily mums.  After a year, everything is thriving, and we even had to widen the bed to make room for our hostas.  I’m probably going to have to divide them next year, and my neighbor is planning to give me some of her divided hostas, too, which will mean even more hostas.  Yay! I just love hydrangeas and hostas together, though this year our hydrangeas bloomed pink instead of blue.  I love the deep purple-blue, but the pink were a nice change. I envision pink in the front near the house (near the foundation it will be a tough battle to maintain the right soil ph for blue) and blue in the back along the new white fence.  We’ll see.

Last Year                                                                                 This Year

IMG_3063IMG_4756

 Side Yard

Yes, we have two side yards, but only one is pictured.  The other one hasn’t changed much. Our west side yard was the priority, primarily because of the magnolia looming over our house (the roots were too close to the house foundation to be safe) as well as the other overgrown shrubs. We replaced them with a variety of plants including knockout roses, loropetalum, canna lilies, caladiums, purple fountain grass, and monkey grass. Everything has grown so quickly that is hard to believe it’s only been a year since these were planted. The pavers and the pine straw that our neighbors had spread on our yard have now been replaced with flourishing grass.  

                                 Last Year                                                                                 This Year

Westyard IMG_5042

Back Yard

The backyard has also changed dramatically.  Again, our goals were primarily to take out overgrown and ill-placed shrubs and trees, and down the road, replace the fence.  We added more flowerbeds, filled with canna lilies, lantanas, banana trees, roses, etc. We also tried a fruit/vegetable garden this year (mostly not a win), and started replacing the fence.  After buying a new outdoor area rug and some lawn furniture, we actually had people over for a cookout, with enough seats for all.  Yay!

Last Year                                                                                 This Year

BackYard1 IMG_4610

Overall, here’s what’s been accomplished thus far:

  • Moving gate latch to the inside of the backyard (Surprise! We discovered we did in fact have a gate latch already, but it was put on the outside to allow free access to our backyard to any interested parties…what-tha-what?)  We now realize how the neighbors were able to show other interested buyers the backyard while we were looking at the inside with our realtor!) (1)
  • Cut down imposing magnolia in side yard (2)
  • Trim trees, shrubs, and grasses (2)
  • Remove sago palms in the way of mowing (2)
  • Replace rotted fence board (2)
  • Test/correct sprinkler aim (2)
  • Clear easement behind fence to keep weeds out of our yard (2)
  • Remove overgrown (ugly) hedges and grasses and snakes, oh my! (2)
  • Remove scalloped landscape edging (3)
  • Add new plants, mulch, and edging (3)
  • Replace odd flower bed between entry and driveway with brick pavers so that we aren’t stepping out of our car into the flower/weed bed (2)
  • Cut down magnolias in backyard (3)
  • Paint faded mailbox (2)
  • Shadowbox wood fence (3)
  • Line fence with crape myrtles for low maintenance privacy and shade (3)
  • Add edible plants! (3)
  • Upgrade fence (4)
  • More patio furniture for people to be able to join us in our back yard (3)
  • Expand patio area (4)
  • Add gate on garage side for convenience (4)
  • Add sunporch? (4)
  • Add pool? (4)

Staying on top of things with the yard hasn’t been the easiest during our flooring project. We are constantly battling the weeds in the back, so we are brainstorming solutions for keeping them out more easily (that don’t involve lots of toxic chemicals!).  We also hope to finish the fencing and rearrange some plants in September to give them time to get established in their new homes before cooler weather arrives.  Ah, so many projects, so little time.