
Newsflash: We are back in demo mode! The KaZoo Kitchen is no more. Well, the old one anyway. When we bought the ‘Zoo in December 2013, our kitchen looked like this:

It was a typical builder kitchen with basic white appliances, stock thermofoil cabinets, beige laminate countertops, beige vinyl tile, and a micro pantry. All the essentials, and all functional (mostly). Once we brought our old (but newer than theirs) fridge and a new gas range, things were looking up:

After installing our hood vent in summer 2014, which necessitated the removal of some of our wall cabinets, the kitchen took a turn for the worse functionally and aesthetically. We added some hardware to facilitate drawer and door opening, but the loss of so many upper cabinets was rough. We painted to help the kitchen feel happier until we could do a real renovation.

In the interim, we began discussing ideas for our future kitchen. Almost immediately, we began dreaming of relocating the refrigerator: Its position in the southeast corner meant we could never open the refrigerator door fully. Stuffing pizza boxes, jugs of milk, watermelons, holiday turkeys, etc. in the refrigerator was next to impossible, but even regular things like heads of lettuce, bagged carrots, and leftovers saved in Pyrex containers proved difficult. While buying a French door fridge might help matters somewhat, we were also frustrated with the inefficient pantry on the opposite end of the kitchen (deep but not wide = digging out 10 things to get 1 item at the back). While having a pantry is nice, we decided we’d rather have more cabinets and counterspace…and was it remotely possible that the fridge would fit in the pantry’s spot if we tore down the pantry?! We couldn’t shake the idea, and after measuring, there was joyous celebration in the KaZoo Kitchen for the kitchen-to-come.
Of course, we were concerned the pantry might be structural, but other homes with our same floorplan in the neighborhood didn’t have a floor-to-ceiling wall at the pantry (the boxy area above our pantry was completely open to the living room in the other homes), which gave us hope. We took everything out of the pantry (feel free to play “Where’s Hermes?”)
and tore into the drywall above the pantry to check things out.
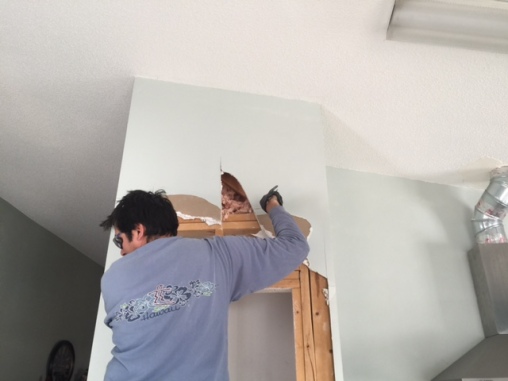
Our basic understanding of structures was telling us we were looking good, and after getting a licensed professional to confirm our suspicions, Mission Fridge Move was a go! That’s when the fun of Demo Day began. Kicking down drywall is so…satisfying!


Once the pantry was torn out, it was amazing how open the kitchen felt! While we had attic access above the old pantry/new fridge location, my dad and I installed a new electrical circuit and outlet so that the refrigerator would have its own independent circuit. My dad is a professionally licensed electrical engineer, and while I could do the wiring myself now after years of helping him, I’d rather have a professional on the site.
There’s a lot of shoddy DIY structural, electrical, and plumbing work out there that might get missed in a regular home inspection that can be the ultimate nightmare, so be skeptical of any home that’s obviously been renovated (especially if you see signs of bad workmanship, like the worst painted-over, patched drywall you’ve ever seen). Chances are, those homeowners may not have gotten the licensed professionals, permits, or inspections necessary to ensure a quality job. Installing or moving electrical, structural, and plumbing is a huge deal. Just because a friend or family member ‘taught’ you how to do something back in the day doesn’t mean it’s up to current code or would meet the code for the state in which you now live (Florida and California have specialized requirements, for example). Calling a professional is not a sign of weakness; it is a sign of intelligence.
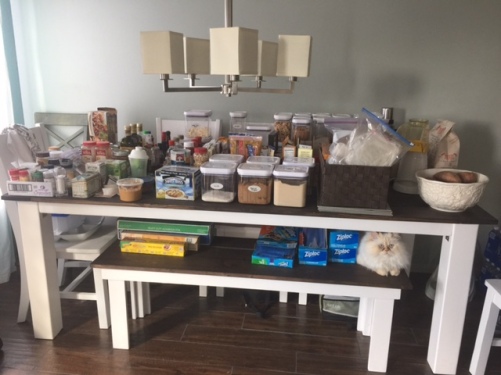
We then took out the island, scraped and cleaned the remaining vinyl tiles up, lay the underlayment, and tiled the first part of the kitchen. We also patched, taped, mudded, and sanded the drywall in the new-fridge area.


After allowing those tiles to set, we took out the rest of the cabinets, only to discover damaged drywall behind the sink, where the previous residents clearly had experienced a leak at some point. We expected some damage because of the water damage we had seen in the cabinets, but it was more extensive than we had hoped.

We had a mold inspection when we purchased the house that came back good to go (otherwise we would not have purchased the home), but we definitely wanted to get rid of the water damaged drywall (and the insulation behind it) ASAP, now that it was exposed and accessible. At this point, our fridge got to move to its new, happier home. Behold the wonder and glory of being able to open the doors completely!


Can’t you hear angels singing? Hallelujah! We can. Every time I open the fridge now I can’t help but smile. You’ll note that we left the wall to the left of the fridge (a) because it had the kitchen switches on it) and (b) because we wanted the wall to hide the fridge from the view in the rest of the main living and dining area, which it does rather well.
Anyway, out went the damaged drywall, followed by the insulation, as carefully as possible to minimize possible mold spore diaspora. We took out everything in all areas evidencing any water damage plus a bit beyond the damage, both vertically and horizontally, just in case. The studs were fine, though. Whew. We installed new insulation and mold resistant purple-board (the new green-board), which was made easier with a compass-like drywall cutter than enabled us to cut clean circles for the pipe fittings and wiring.


We taped and mudded the new drywall, then lay more underlayment. The floors would already have been finished, but we wanted to keep our range connected to the gas, which has meant flooring in phases.

Hermes is ready for things to be finished. So are we. Next time we’ll be sharing the finished flooring, painting, and all about the cabinets. I can’t wait to put ALL THE THINGS in the cabinets. And now back to work. 😉
