We’ll be back on Thursday with a post about finishing the range hood (mostly). We took a break from working on the range over Labor Day weekend to do other projects and spend some time at the beach, so today we’re cleaning out the closet in preparation for our next mini-makeover: The Master Bedroom Closet.
I love to organize. Chris does not. Nevertheless, he agreed to a purge and reorganization of the master closet recently. There’s nothing like that back-to-school time to re-organize a closet, even if you don’t have kids. Technically, I’m still in school, so that counts, right?
When I first arrived at the ‘Zoo, Chris had taken over most of the master closet for himself. This was a problem once some of my clothes arrived. This was more of a problem once I arrived with the rest of my wardrobe at the end of May.
I tried two different arrangements of our clothes that didn’t work, thanks to a poorly designed closet space that is probably all too-familiar to anyone living in a builder home. These are my “builder closet hangups” that forced us to get creative and make tough decisions about our clothing:
Problem 1: One Trick Rack Pony
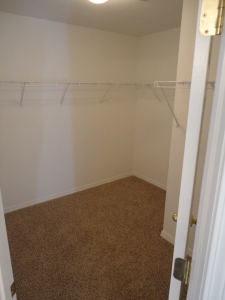
A typical builder closet “feature” is the singleton rack that wraps around some, but not all, of the closet at a Goldilocks height (not too high, not too low, just right…for no one), making it impossible to add a rack above or below without yanking out the original, nailed-in rack, patching a million anchor holes, and starting over. A single rack is never adequate for a master closet unless the sole occupant is a single male and even then, you may have a space issue if that male happens to like clothes or hoard clothes that don’t fit but remind him of the glory days of youth.
Problem 2: Clash of the Titans Wire Racks
Also in typical builder fashion, the closet has one wire rack that spans the long wall plus two shorter walls, each with another (smaller) singleton wire rack. The long wall intersects with one of the short walls, closing off the last two feet of long wall rack and/or the first foot of short wall rack from use because the clothes block each other. If they had used one of the curved corner sections of wire rack, this would not be such an issue, but it’s possible those weren’t readily available (for cheap) when our house was built. Thus, there is the appearance of plenty of hanging storage, but it is simply an illusion. The builder didn’t even try to put racks on the other walls, which is probably for the best because it would have multiplied the issue.
Problem 3: (Not) Working All the Angles
The third issue I have with our master closet is how many corners and awkward angles are part of the closet. The furnace room juts into one section of the closet, cutting off an entire section of useable space. The angled entry renders both the immediate left and right of it useless for storing anything but slender belts or scarves; otherwise, you can’t walk into the rest of the closet. Plus, the door swings to the right, blocking access to the singleton rack when you first enter, forcing you to shut yourself in the closet to access your clothes. Although the square footage of our master closet may be alluring on paper, our walk-in closet feels only slightly bigger than a step-in closet.
Problem 4: Let There Be [Dim] Light
On the plus side, our closet will make a good storm shelter because it has no windows and is centrally located in the house (along interior walls only). On the minus side, the lack of natural light plus the dimmest, cheapest dome light ever make for a dark space. After moving to the ‘Zoo from the city, I discovered that Chris had been wearing shirts to work with holes and stains despite having enough nice shirts in the closet. He literally couldn’t see the stains and holes in the darkness of the closet. Yikes!
So what did we do to troubleshoot? Find out next time….

2 thoughts on “Master Closet Part I: Builder Basic “Hangups””