
We aren’t quite finished with the range hood situation, so today we’re sharing a smaller yet satisfying kitchen upgrade: cabinet hardware.
One of the most annoying things about moving into this house was how difficult it was to open our kitchen cabinets (and bathroom cabinets) without hardware of any kind. Although the doors and drawers technically had that weird routed out part of “wood” you could grab to pull, the cabinets had been repainted at some point before our time with semi-gloss paint (when the humidity in the house was relatively high), so we had to play tug-of-war to counteract the gloss-on-gloss stickiness. 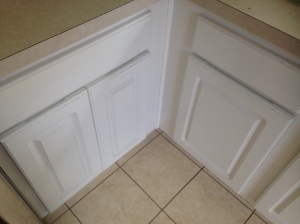
After a few months of this, we were ready for some hardware. We prefer pulls to knobs, so while we were at Lowe’s using our other 10% off coupon, we grabbed a couple of contractor packs of simple brushed nickel pulls. We thought these would best complement our growing collection of stainless appliances but not draw too much attention to the cheapness of the existing cabinets.
My dad offered to install the first drawer pull as a test-run of what we would need to do for the rest. I helped him measure and mark the locations of the holes we would need to drill. The distance from the center of one pull leg to the other (leg = where it attaches to cabinet) was 3 inches, so we measured the length of the drawer to find its midpoint and then measured 1 1/2 inches to the left and to the right to mark the holes. We decided to place the handles at a 2/3 height from the bottom of the drawer face rather than exactly halfway because they looked a bit low at the halfway point. Although playing with thirds can be tricky, the 2/3 height turned out to be right at 3.5 inches from the bottom of the drawer front.

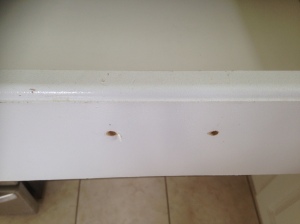
As you can see in the picture above, we had to drill through the interior wall of the drawer and then into the drawer face, but the screws included in the hardware pack would not be long enough to go through both and stick out enough on the front to screw into the pull.
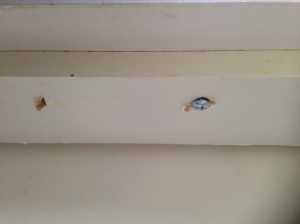
My dad suggested a drilling sequence of (1) pilot hole, (2) large hole in interior wall for screw head to pass through it, (3) small hole for screw to pass through drawer face. It worked like a charm.
After my dad left, I measured and marked all the remaining drawers and doors on the lower kitchen cabinets. For the doors, I just found the midpoint of the flat face on the opening side of the cabinet to center the pull and then used a level to mark a tiny line across the top of the recessed panel on that same flat part for the height of the pull. Once Chris got home from work, we installed all the remaining hardware. We didn’t put any pulls on the uppers since we knew those were going to be coming down anyway to make room for the range hood.
Before

After

Now that we’ve had pulls for a few weeks, we both agree that they are a small upgrade that makes a big difference in our kitchen’s functionality. We plan to reuse the pulls when we eventually upgrade our cabinets (plus a few extra we have in reserve for adding more cabinets at that point), which also makes it a worthwhile investment that we can continue to enjoy down the road. If we were going with special order fancy pants pulls, we would not have bought hardware in advance of our major upgrade down the road in case of running out of pulls and not being able to re-order more, but since we went with the plain Jane pulls, we were able to buy enough at a decent price to have plenty for the upgrade later…and they are likely to stay in stock if we did run out for some reason. For the time being, it’s nice to have a handle on the kitchen (and everything in it).

